Add an Assistant to Your Telegram Bot Web Panel
When you create a Telegram bot and register it in SmartBotsLand, your bot will have its own Admin Panel (Dashboard). This panel gives you a variety of tools and features to manage your bot and users easily — without needing any coding knowledge.
However, in some cases, managing everything alone can be time-consuming. That’s why it can be very useful to add an assistant to your Telegram bot web panel. An assistant can help you with tasks like uploading new content, checking reports, creating or deleting buttons, or handling user management.
Why Should You Add an Assistant?
Having an assistant in your admin panel can save time, reduce your workload, and increase productivity. Here are some key benefits:
- ✅ You don’t need to share your main login information (email and password). Each assistant gets a unique account.
- ✅ You can assign different levels of access depending on the assistant’s role. For example, one assistant can only manage bot buttons, while another can upload files.
- ✅ Workload can be divided between multiple people, which reduces pressure and improves efficiency.
- ✅ Every assistant has clear responsibilities, improving customer support and content management.
How to Add an Assistant
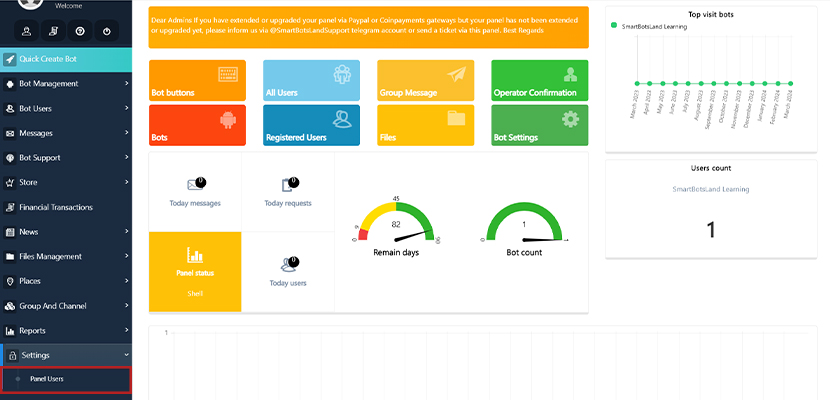
1. Enter your admin panel.
2. From the “Settings” menu select “Panel Users“.
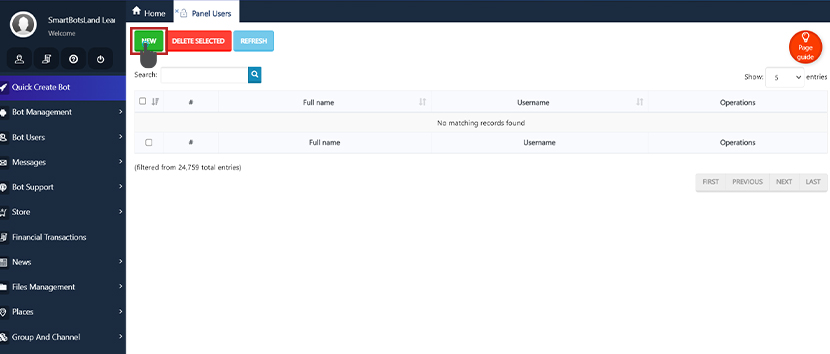
3. Then, click on the “New” button.
4. Fill out the “Personal information” section.
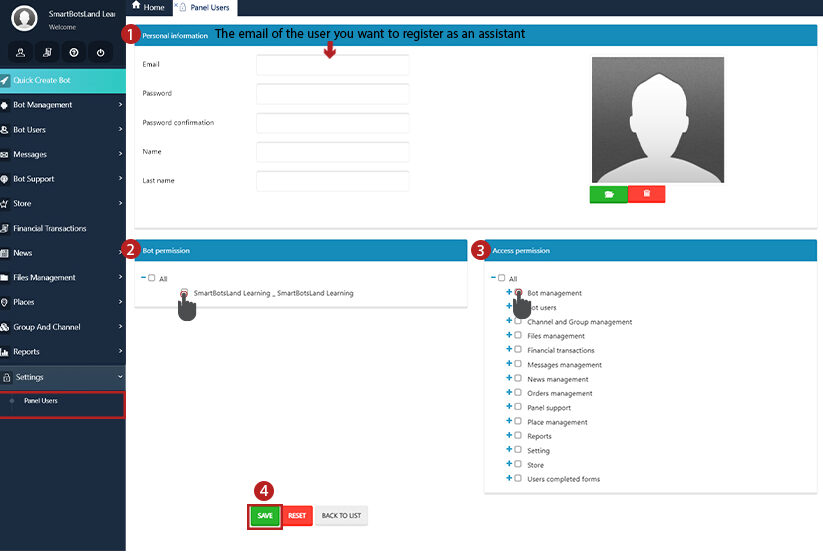
Note: Do not enter duplicate email.
When you click on it, it will show you the emails you have entered, which you should not use.
5. In the “Bot permission” section, you can choose which bot your user has access to.
Note: The number of your bots depends on the version of your bot.
6. In the “Access permission” section, you can specify which parts of the panel your assistant has access to.
Note: It should be noted that you can limit your assistant’s access to some parts of your admin panel.
In the “Access Permission” section, you can decide exactly which parts of the panel the assistant can use.
For example:
- One assistant may only manage content uploads.
- Another may have access to bot buttons.
- You can even limit permissions to just one button if necessary.
This flexibility makes sure assistants only have access to what they need.
7. Click on the “Save” button.
Note: You must have allowed the assistant to access the “bot buttons” in the “Access permission” icon so that you can specify which buttons it has access to in the next step.
8. In the “Panel users” tab, there are 5 icons in front of each assistant, which I explain it one by one in the below :
![]()
- Once saved, you will see your assistant listed under the “Panel Users” tab. In front of each assistant, you’ll find 5 management icons:
- Edit Icon – Update the assistant’s information and permissions.
- View Icon – See details of the assistant’s settings.
- Password Icon – Generate a new password for the assistant.
- Button Permission Icon – Select which specific bot buttons the assistant can access.
- Delete Icon – Remove the assistant from your panel.


No comment