How to Create Your Telegram Store bot in SmartBotsLand ?
This instructional article where we will guide you through creating your own Telegram Store bot on SmartBotsland. Building a bot for your store can enhance customer engagement and streamline sales processes.
Follow along to learn how you can leverage SmartBotsland’s tools and features to craft a personalized shopping experience for your customers. Whether you’re new to bot development or looking to expand your digital presence, this guide will provide you with the essential steps to get started.
Step1: Create Your Bot in Botfather
Related: How to Create Bot in BotFatehr
Step2: Register Your Bot in SmartBotsLand
If you want to know how register your bot in SmartBotsLand, follow the steps below:
- Send “/start” in SmartBotsLand
- Click on “Create Bot” button.
- Select “Create Store Bot” button.
- Fill in your name, email, password, and country.

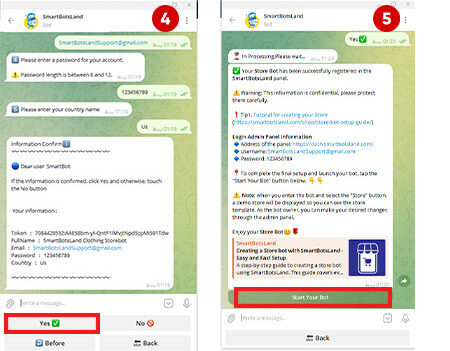
After registration, you’ll receive a message with your login details. Use these to access your admin panel.
The Store Bot Template Menu
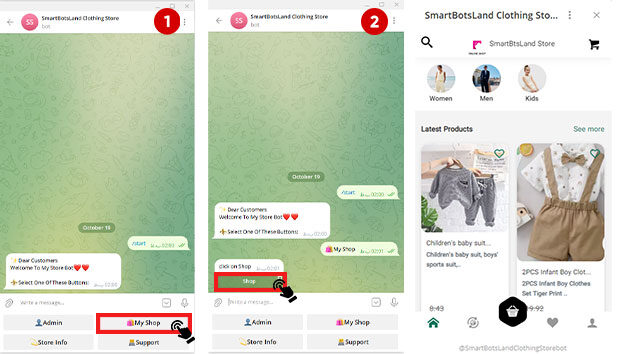
Then send “/start” in your bot to view the default menu buttons. Also you have to know that you can customize these later.
For see how is the store in SmartBotsLand, You have to click on the “🛍My Shop” button and then click on “Shop” button to check out a sample store we’ve set up for you.
This gives you an idea of how your store will look and function. Feel free to delete, edit, or add products to suit your needs!
Note: You can choose how is display your store in a web app format or limit it to the bot only.
As the bot owner, you will see the “Admin” button.
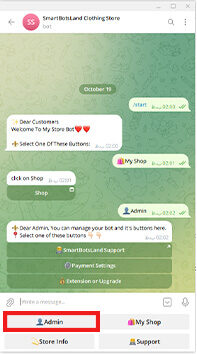
You can see some sub button in “Admin” button.
- Extend and Upgrade: Use this button to upgrade your bot after your 7-day free trial.
- SmartBotsLand Support: For assistance, click the Support button to contact our team. We’re here to help you!
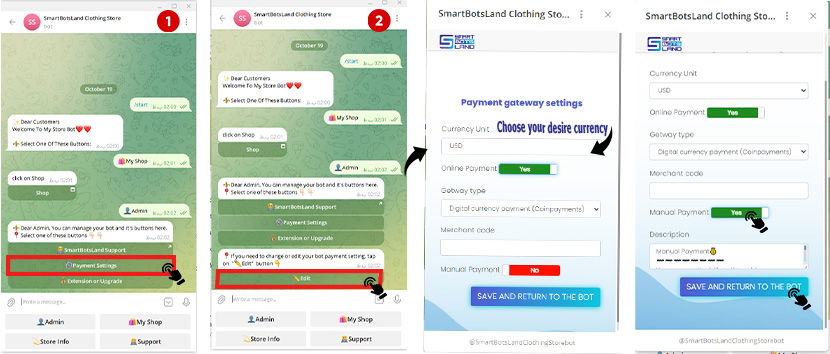
- Payment Settings: Use the Payment Settings button to choose your currency and payment method. You can use CoinPayments for online transactions or set up manual payments where users send you payment receipts for approval.
- Login to admin panel: By clicking on this button, you can get your login information.
Your customers will see a “Support” button, which allows them to share their feedback and thoughts with you. You can also respond to them directly, or set an operator to handle these interactions.
If you’d like to learn how to set up this feature, I recommend checking out our tutorial on setting up the support system.
Related: How to Support Button in Your Bot
Step3: Edit your Store from admin panel
1. Use the information you received in the final step of registration on SmartBotsLand to log into the admin panel(Dashboard).
2. Click on “My store” from “Store” menu.
3. Click on “Edit” icon in front of your store.
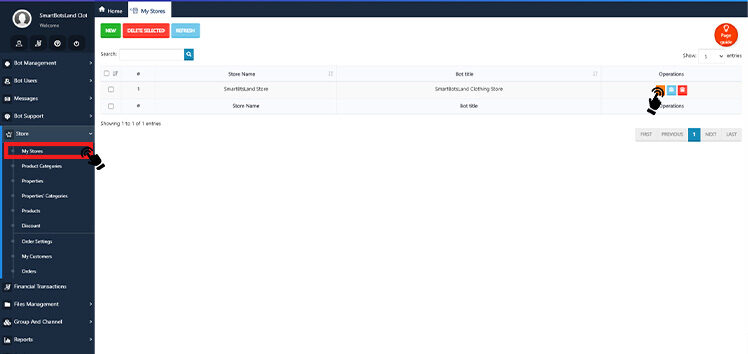
Because we set sample store for you, you can delete or edit it.
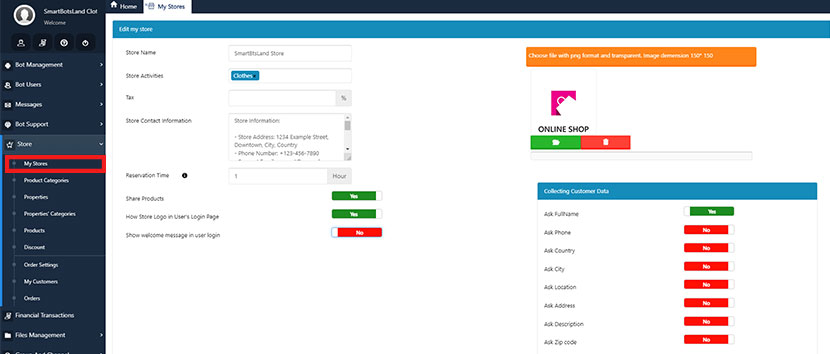
4. In the new page, you have to set your store information which explain in the below:
Edit Your Store
In the store settings, you can manage key details like store information, reservation time, and customer information forms. You can also set the store name, configure operators, and choose payment options.
To make these changes, go to the “My Stores” section in your panel and select the “Edit” option from the menu.
Store Name: You have to set suitable name for your store which can introduce your product.
Store activities: You can choose your store activity from here.
tax: This tax is intended to help the government generate revenue and discourage consumption. It is usually a percentage of the total price of the product or service. Value added tax is applied to most goods and services, with a few notable exceptions.
Store contact information: It’s necessary to write the information and details about your shop like: address and phone number and etc.
Additionally, make sure to update these details if any changes occur. This will ensure that customers can contact you with any questions they may have about their order. This contact information will be used to contact you with inquiries about our products and services.
Reservation Time: Define how long items stay reserved in carts (e.g., two hours). After this time, items will automatically be removed from the cart and returned to store inventory.
Share Product: By enabling this button, your customer can share your product with their friends, So they can help you to generate your store.
Show store logo in user login: You can set a logo for your store and enable this button. Therefore; whenever your users click on your store, they can see the logo.
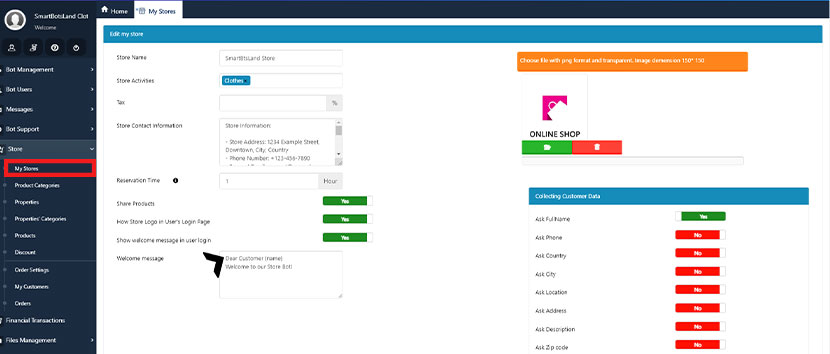
Show welcome message in user login: You can adjust this button to “Yes”, if you want your users receive a welcome message, after they login to your Telegram bot store.
Tip: You can set {name} in the welcome message, so they get their name in welcome message.
Store payment settings
Set the types of products your store offers and the types of payment users can use:
- Product Types: Can be “Physical” or “File“.
For example, if your store sells physical items like clothes, the product type is “Physical”.
If you sell digital files like software or audio/video files, the product type is “File”.
- Customer Payment Methods: Users can choose “Online Payment”, “Payment on Delivery”, or “Manual Payment”, depending on the options you have enabled:
- Online Payment: If you have a payment gateway like CoinPayments, customers can pay online.
- Payment on Delivery: Allows customers to pay upon receiving the product.
- Manual Payment: Allows you to enter information like a bank account number or wallet address so customers can send payment details (like payment receipts or TXID) to you.
- Tip: you can choose all three options so your customers can choose their desire gateway for paying.
- Receipt Type: Specify whether the receipt customers send at payment is an image, tracking code(TXID), or both.
- Send Invoice to Customer: Enable this option to send an invoice to the customer after payment.

After setting everything up, click the “Save” button to save the settings.
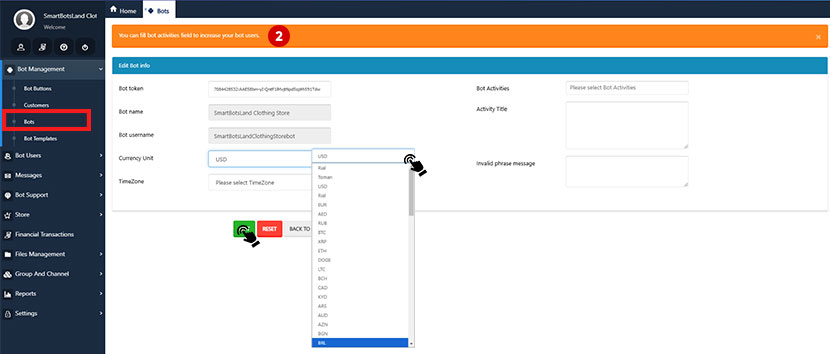
How to Change Your Currency
You can easily set your preferred currency by following these steps:
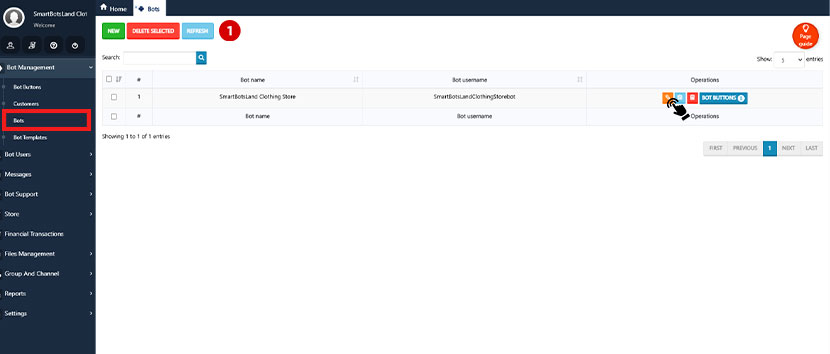
- Go to your “Admin Panel“(Dashboard).
- In the “Bot Management” menu, select “Bots“.
- Click the “Edit” icon next to your bot’s name.
- In the “Currency” section, choose your desired currency.
Product categories
It is obvious that for organizing your products, you need to categorize them.
Product categories for each store are entirely based on your preferences and the needs of your customers. Let’s go over a few examples to better understand the concept of categorization.
Imagine you have a bookstore. Books can be categorized by genre or topic. However, in some stores, categories might be based on authors or publishers instead.
You can also break down broader categories into subcategories if needed.
For example, in a health products store, categories can be based on brands or companies. Alternatively, you might categorize products by their use, such as skincare or haircare. These categories could be further divided into subcategories like products for men and products for women.
Think of categories like folders where you organize your products.
For this you need to do the steps below:
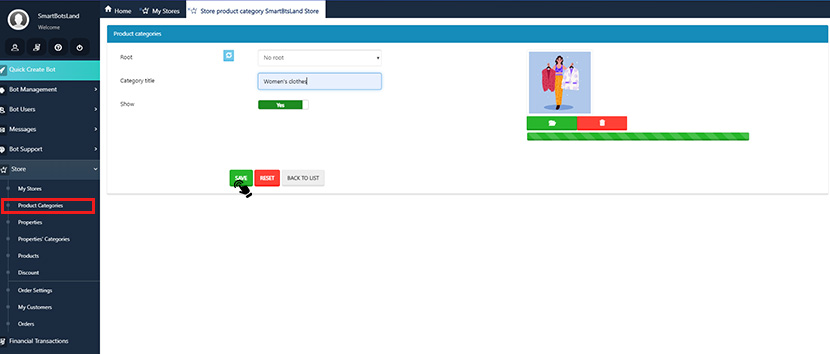
1.In the “Store” menu, select “Product Categories” and click “New” button and then in new page you can see these items:
- Root: If you want the new product category to be a subcategory of another category, select the desired root category here.
- Product Category Title: Enter the desired title. Choose a meaningful title, so users can quickly and confidently identify the category.
- Show: Specify whether this category should be shown to users.
- Upload Image: If needed, upload an image for each product category to help users identify them better.
2. After entering the information, click the “Save” button.
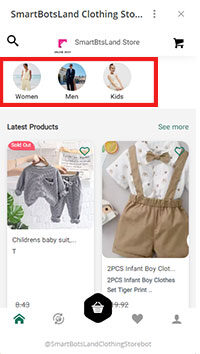
The final thing your user sees:
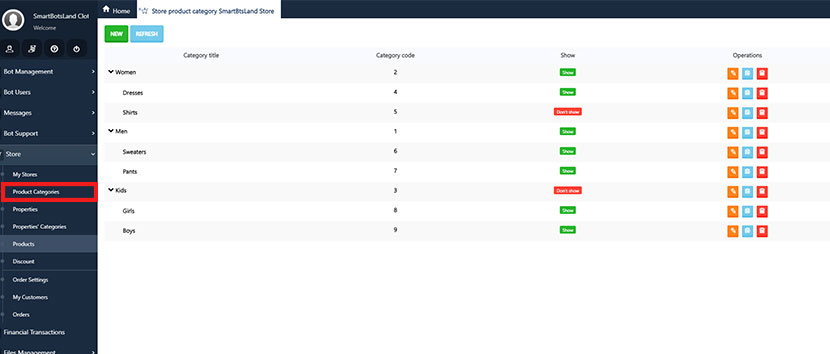
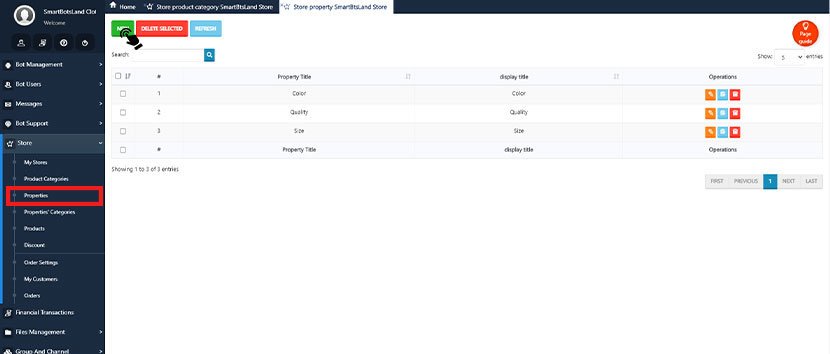
Managing Product Categories
After submitting the product category, you can see a list of your product categories in the “Product Categories” menu.
You can see three icon in front of each category which explained in the below:
- Edit: You can edit your setting of creating category by this icon.
- Details: You can see the details of each category by clicking on this icon.
- Delete: You can delete each category by this icon.
Tip: You cannot delete categories which has subcategories.
Product Property
In the “Store” menu, select “Properties” and click “New” button and then in new page you can see these items:
- Property Title: Enter the property related to the product, such as “Color”, “Size”, “Weight”, etc.
- Display Title: This optional field allows you to set a display name for the property, visible to your users.
- Property Value: Click on “Plus” button and assign various values to the created property.
- Finally, after entering the information, click the “Save” button.
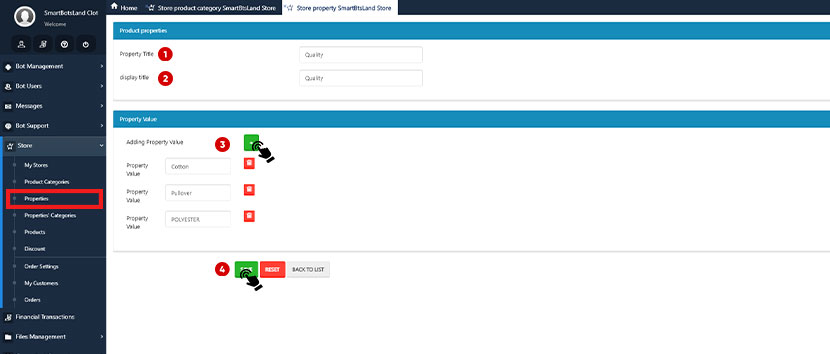
For example, if your feature is “Color”, you can add values like “Red”, “Blue”, “Green”, etc.
The final thing your user sees:

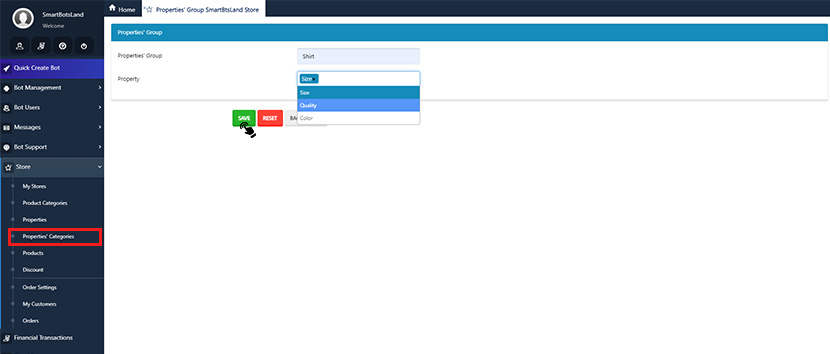
Properties Categorization
From the “Store” menu, select “Properties Categorization“.
Click the “New” button.
Properties Group: Enter the name of the desired feature group. This name is not visible to users and is used only for organizing and managing the categories.
For example, “Physical Features”, “Technical Features”, etc.
Selecting Features: Choose the defined features for this feature group. Selecting features means you want to use this feature group in your product categories.
After selecting features, click the “Save” button.
Now, when you assign a category to a product, instead of selecting properties one by one, you can use the created property group.
Example: Suppose you have a clothing store with the category “Shirts”. You can create a property group called “Size” and select the features “S”, “M”, “L”, “XL” for this group.
Now, whenever you add a new shirt, you can choose its size from these properties .
- Property Group: Size
- Properties :
- S
- M
- L
- And XL
- This property group helps you use similar properties grouped in your products, enhancing user experience and simplifying product management.
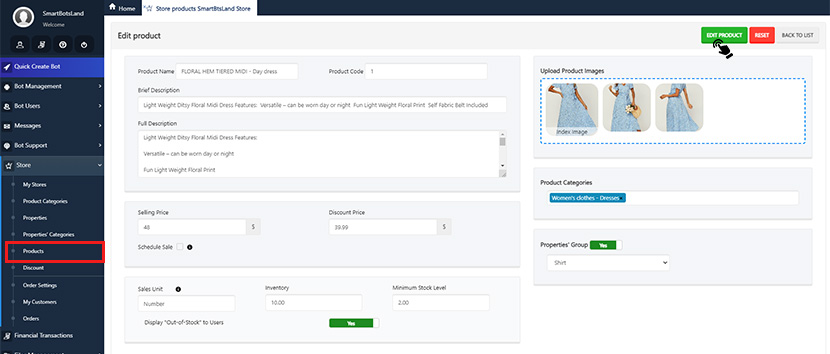
Products
Follow these steps to add a product to your Telegram Store bot:
1. Product Name: Enter the desired product name. The product name should be clear and specific so users can easily find it, even when searching in your store.
2. Product Code: If you have a physical store, enter the product code here.
3. Brief Description: You can set your desired description here and you have to know that your customer can see this description in the bot, so write it carefully.
4. Full Description: This section is for writing a detailed description about the product.
5. Real Price: You can set the price of your product here.
6. Discount Price: If you’ve applied a discount to your product, you can enter the discounted price here.
This way, users will clearly see that the product is on sale!
Product type
7. Specifying the Product Type:
- If your products are files:
- Inventory: Enter the quantity of your products.
- Display Product When Out of Stock: Enable this option to continue displaying the product to users even when they finished.
- If your products are physical:
- Sales Unit: you can specify your sales unit, e.g., dozen or pack, quantity, jeans, etc…
- Inventory: You can specify the total number of products you have.
- Inventory floor: Enter the minimum number of goods in inventory to receive a warning when the inventory reaches this level
- Display Product When Out of Stock: By activating this option, Your product shown to your customer even they finished.
- Uploading Product Images: You can upload high-quality images that showcase your products at their best.
8. Product Categorization: Add your product to one or more suitable categories to help users find it more easily.
9. Finally, after completing the product information, click on the “Insert Product” button to add your product to the store.
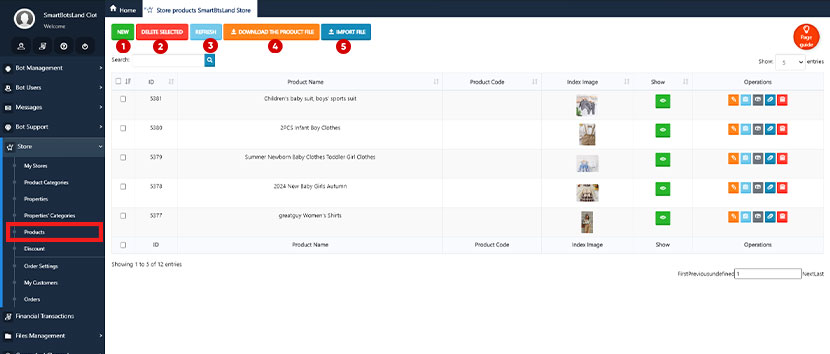
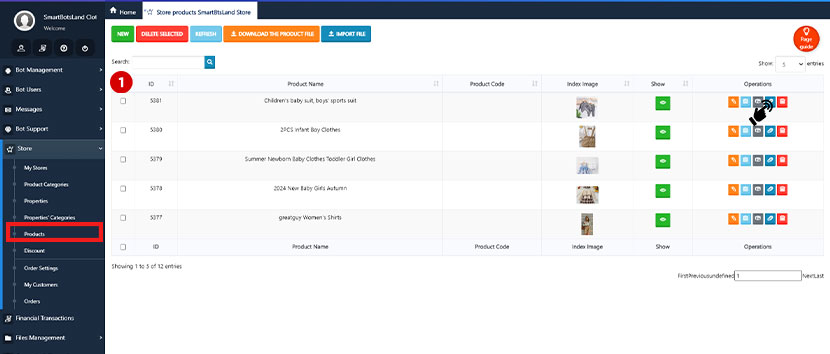
Manage product
By selecting “Products” from the “Store” menu, you will be directed to a new page where you will see five different buttons at the top:
New: Clicking this button takes you to a new page for adding a new product.
Edit: By clicking on the edit icon, you can edit the information of your product. This includes changing the name, adjusting the selling price, updating the product description, and changing other relevant information.
Details: By clicking on the “Details” icon, you can view all the registered information for each product. This includes the product name, product code, brief and detailed description, selling price, sales schedule, and other features.
Product Properties: Clicking on the “Product Properties” icon directs you to a new page where you can add features to the intended product.
Deleting a Product: By clicking on the “Delete Product” icon, you can remove that product. To delete a product, you must also delete its image and related features.
Delete Selected: Clicking on the “Delete Selected Items” button allows you to select and delete multiple products at once.
Refresh: After making any changes on the products page, click the “Reload” button to refresh the page and save your changes.
Download Product File: Clicking on the “Download Product File” button gives you an Excel file. This Excel file contains necessary information about your products and their features. You can a product name, features, price, etc. without entering the web panel. Note that you cannot upload images or product files all at once in this Excel file.
Import File: After filling out the Excel file according to the guide, click on the “Import File” button to upload it in the panel. The Excel will automatically add the manually-added features to your bot.
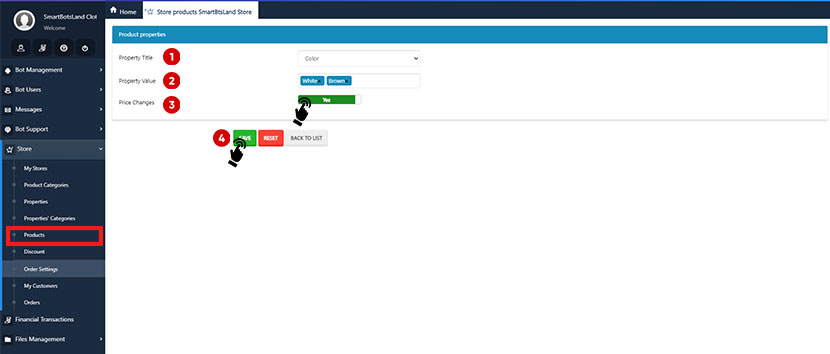
Add properties to each product
To add a new property, click on the “New” button and follow these steps:

- Property Title: Enter the desired property name like “Color”, “Size”, etc.
- Property Value: Select one or more values for the feature such as “Red”, “Size”, etc.
- Price Changes: If enabled, you can set different prices for each property value. For example, for different sizes of clothing, you can set different prices.
- After filling in the information, click on the “Save” button.
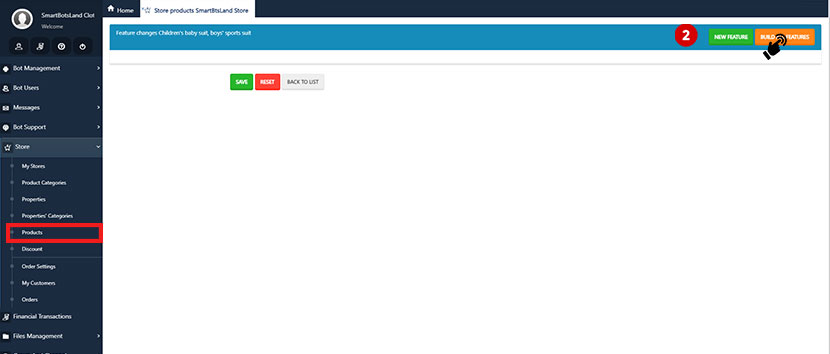
Property changes
When setting up products in your Telegram Store bot, you can add variations to a single product by assigning different attributes like color, size, or any other feature relevant to your item. These variations allow your customers to choose the option they prefer, while you can manage each variation separately.
For example, if you’re selling a shirt, you might offer it in multiple colors (red, blue) and sizes (small, large). To handle this, first define the product (the shirt) and then add the attributes (color and size). Once you’ve set these up, the system will generate all possible variations — for example, a red shirt in large, a blue shirt in small, and so on.
To automatically create these variations, just click the “Build All Features” button. After the system generates each variation, you can then assign unique prices and stock levels to each one. This is particularly useful if certain combinations (like a red large shirt) have different availability or cost compared to others.
By organizing your product variations this way, you can offer more choices to your customers while maintaining full control over your inventory and pricing.
You can see customized features, including product code, inventory, actual price, and selling price.
Even you can clicking on this icon allows you to delete the feature. This means the product either doesn’t have this feature or the price of the product varies based on this feature.
After creating these variations, click “Save” and return to this page. Here, you’ll see options to download, edit, or export these variations. You can easily set prices and stock levels for each variation directly. Alternatively, if you prefer to update multiple items at once, download the file, adjust the prices or stock in bulk, and then re-upload it.
Managing Variations
You’ll see fields like product code, inventory, actual price, and selling price for each variation. If you need to remove a specific property from a product (e.g., if a color or size is unavailable), you can delete that variation with a single click.
By organizing your products with these properties, you give customers more options while keeping full control over pricing and inventory.
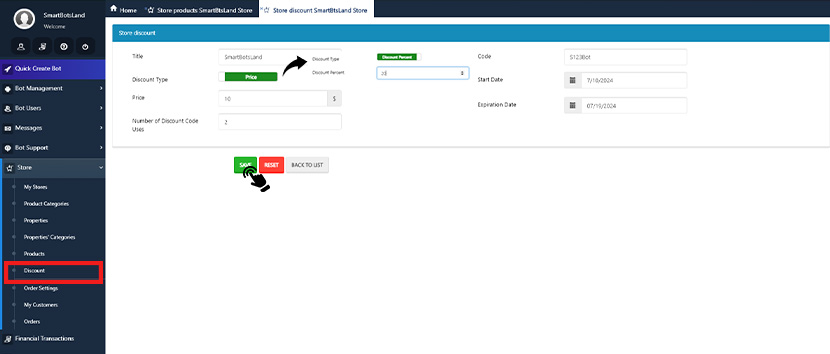
Creating Discount Code
To create a new discount code, select “Discount” from the “Store” menu.
- Title: Choose a suitable title for your discount code. This title won’t be displayed to your users.
- Discount Type: Choose whether the discount is a fixed amount (Discount Amount) or a percentage (Percentage Discount).
- Purchase Limit: Specify how many user can use this discount code.
- Code: Create a discount code using a combination of letters and numbers. Send this code to your users.
- Start Date: The date when the discount code becomes active.
- Expiration Date: The date when the discount code is no longer usable.
- Save: After entering the required information, click the “Save” button.
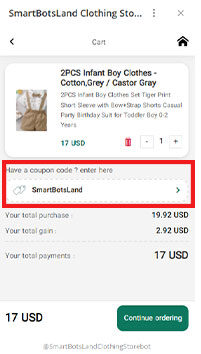
The final thing your user sees:
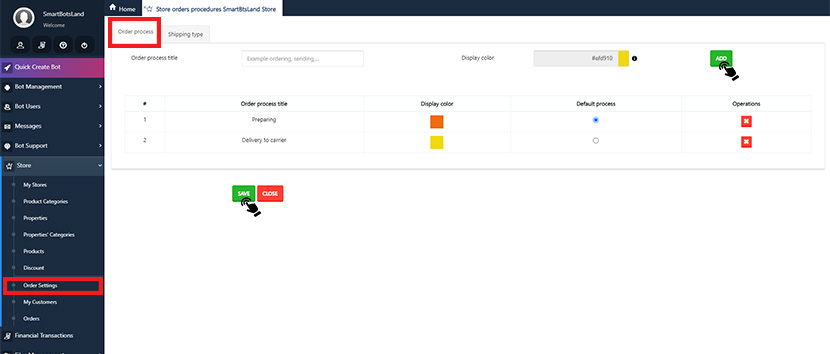
Order setting
For settings related to order processes in your store, go to the “Store” menu and select “Order Settings“.
This will open a page with two tabs for your configuration needs.
- Order setting: In this tab, you can define stages of the delivery process to show users where their items are.
- Order Process: Enter a suitable title for each stage of the item delivery process so users can easily understand at which stage their item is.
- Display Color: Choose a color for each stage to visually indicate to users which stage their item is in.
- Add: After entering the information, click the “Add” button to add a new stage.
- Save: Click the “Save” button to save the changes.
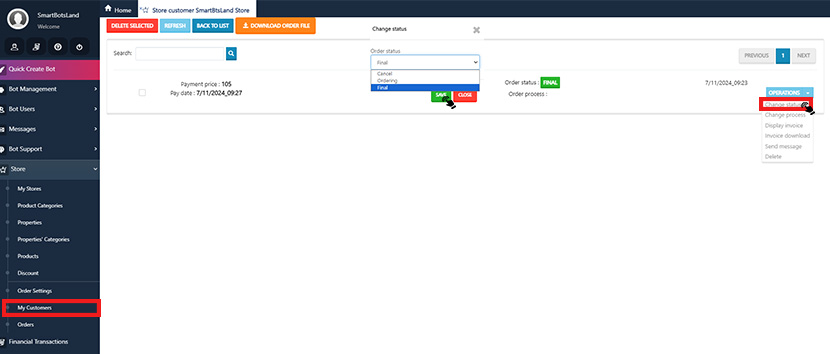
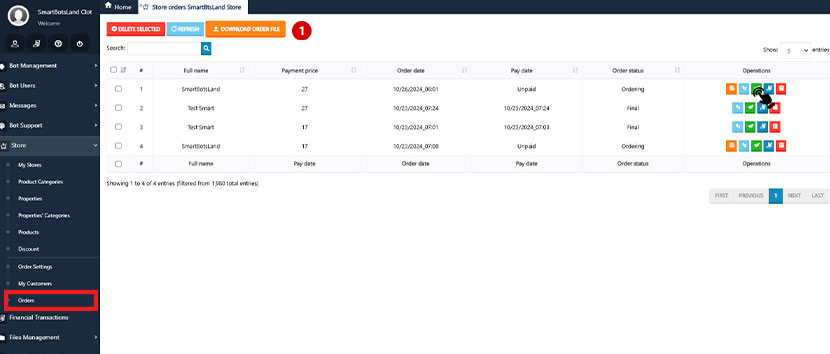
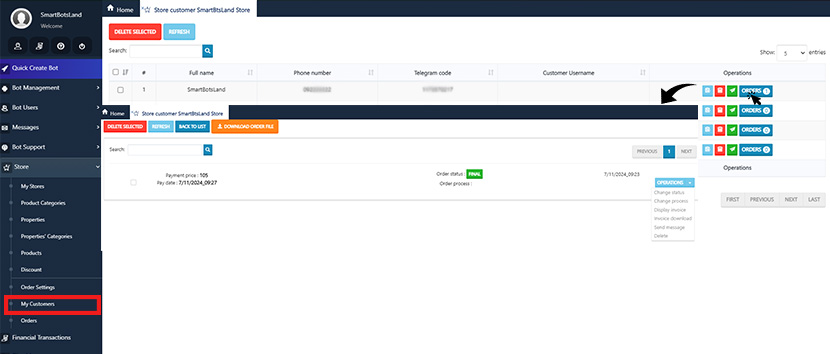
Orders
In the “Orders” section you can see the list of orders that your customers purchased and you should know that you can change the process of ordering and status from here.
There are some operations in front of each orders which explain in the below:
- Change Status: You can change the status of each order by this option(Actually you can choose suitable status like: Cancel, Ordering, Final).
You can only change the status of orders that are “In Progress.”
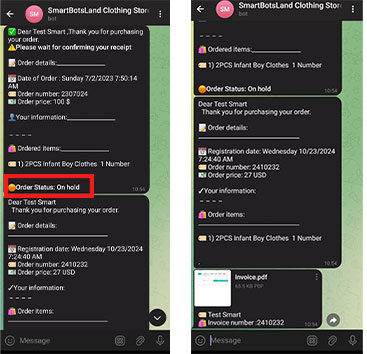
In the case of manual payment, the order remains pending until it is confirmed by the operator. The order will stay in the “In Progress” status until the payment is fully confirmed. If the operator approves the manual payment, the order status will be finalized. However, if the payment is not confirmed, the order will be marked as canceled.
For cash-on-delivery payments, the order status will also be “In Progress.” In this case, after the delivery and payment are completed, the panel user must manually update the order status.
The final thing your user sees:
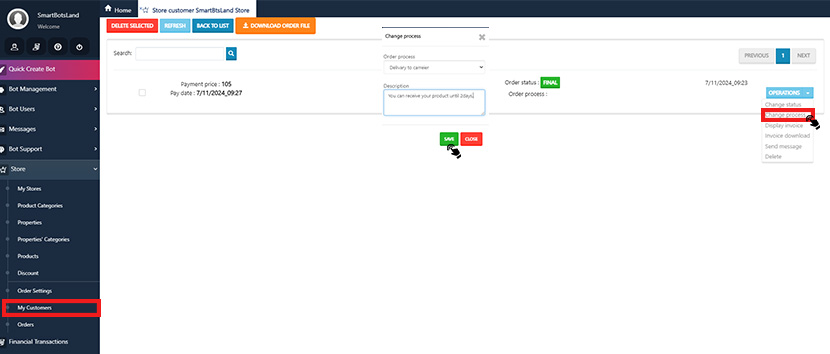
- Change process: You have to change the process of ordering manually.
- Display invoice: You can see the invoice of this purchase by clicking on this button.
- Invoice download: You can get the file of this purchase invoice from here.
- Send message: You can send message to your customer which placed this order by this button.
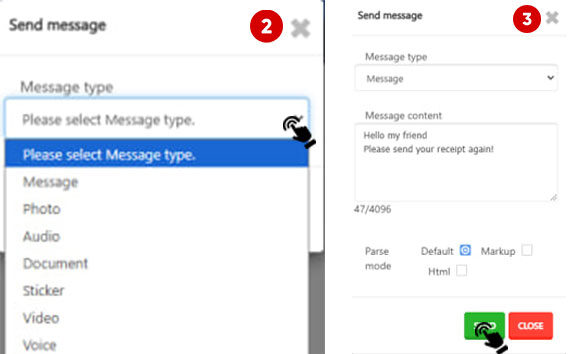
If you want to send a message to all your users, which you can schedule your message to be sent periodically or at a specific time!
Related: How to Send Message to Your Users
- Delete: You can easily delete the orders by this icon.
Note: You can only delete an order if its status is Final.
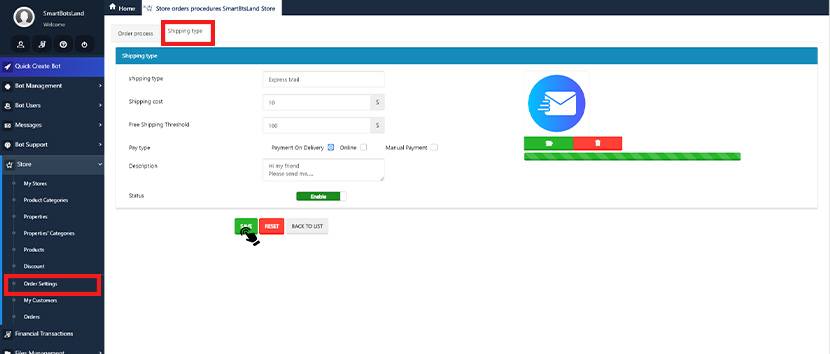
Shipping Setting
To set different shipping methods in your store, follow these steps:
- Click on the “New” button to open the form for adding a new shipping method.
- Shipping Type: Enter a name for the shipping method, such as “Express Mail” or “Courier.”
- Shipping Cost: Insert the shipping cost for each method. It can be either fixed or variable.
- Free Shipping on Purchases Over: If you want to offer free shipping for purchases over a specific amount, enter that amount here.
- Payment Method: Choose which payment methods can be used with this shipping method. Options include “Cash on Delivery,” “Online Payment,” and “Manual Payment.”
- Description: Provide additional details about the shipping method. This can include limitations, estimated delivery times, and other important details.
- Status: Determine the status of this shipping method. You can enable or disable it.
- After entering all the information, click the “Save” button to save the new shipping method.
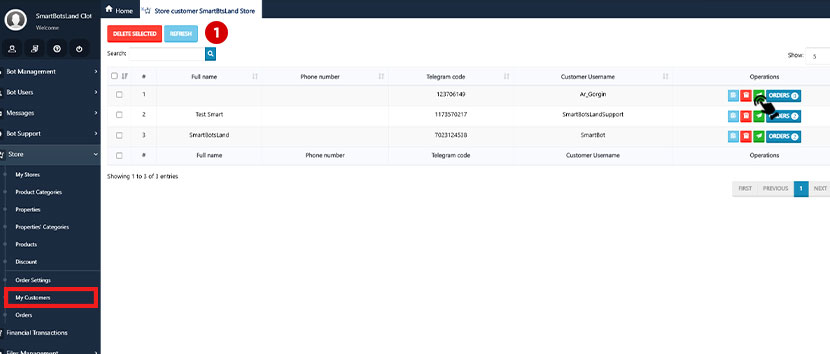
Customer Information
To access customer information and manage orders in your store, select “My Customers” from the “Store” menu.
Upon selecting this option, you will enter a new page that displays a list of your customers.
For each customer, there are four icons with the following functions:
Every online shop has customers. So, as a shop manager, it is important to have list of your customers. by clicking on this button, you can see the list of customers who have registered in your bot and they placed the order.
There are some icons in front of each customer which explained in the below:
- Details: You can see all the information about your customer from here.
- Delete: You can delete your store customer by clicking on this icon.
- Send Message: You can send message(all format of message like text, photo, video, …) to your store customer by clicking on this icon.
- Orders: You can see all orders of this customer via this button.
 In the Store setting you might want to collect specific information from users who purchase your products.
Actually you can enable some of these options so your customer have to fill out them when they complete their purchase order.
This information will be sent to the operator specified in this section.
Store Operators: The operator is also responsible for storing customer orders, tracking inventory, and ensuring that all orders are completed on time. They must also maintain accurate records of all transactions.
Related: How to set the operator?


[…] news is, you can create and launch your Telegram shop bot with SmartBotsLand! Here you will learn how to create a shop bot for your telegram […]