Create and manage a subscription bot with SmartBotsLand! 🚀
Looking to monetize your Telegram channel or group? With the Subscription bot from SmartBotsLand, you can easily set up subscription plans, manage members, and ensure a secure environment for your community.
Why Choose SmartBotsLand for Telegram Membership Management?
1. Easy Subscription Management
Set up automated membership plans for your Telegram channels & groups in just a few clicks! No manual work—everything runs smoothly.
2. Secure & Reliable
We keep your community safe by ensuring that only paying members stay in your group. Users who don’t renew are automatically removed—no extra effort needed!
3. Multiple Payment Options
Accept payments from various gateways, making it easy for members to subscribe and renew.
4. Full Automation & Customization
From subscription reminders to member management, everything is automated! Plus, you can customize settings based on your needs.
What You’ll Find in This Documentation?
✅ Create subscription plans that suit your members.
✅ Automatically manage members and renewals.
✅ Keep your channel safe by blocking unauthorized users.
Whether you have a private channel, an exclusive group, or share premium content, this guide will help you turn your Telegram into a successful subscription-based community.
How do I create a subscription bot?
1. First of all, to get started, you should launch the SmartBotsLand bot.
2. Next, choose “🚀 Create Bot” to proceed with the setup.
3. After that, click on the “💵 Create Subscription Bot” button.
4. Next, click on the “Subscription Bot” button.
4. Enter the bot token you got from @Botfather.
Need help? Check out:
How to create your Telegram bot with @Botfather?
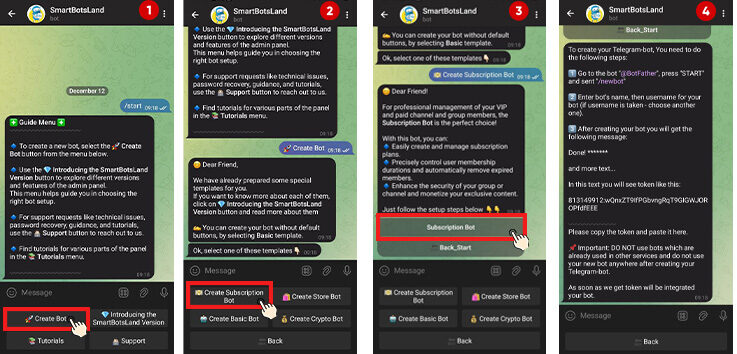
5. In the next step, you should answer these questions:
- First, enter your full name.
- Then, provide a valid email address.
- Finally, select your country.
6. Finally, click “Start Your Bot” to complete the setup.
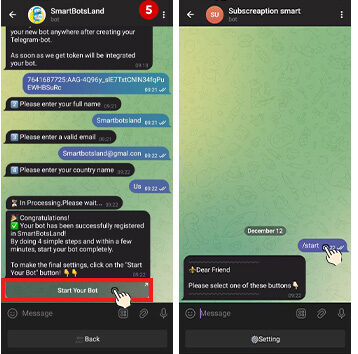
How do I set up a subscription bot?
1. First of all, click the “Setting” button.
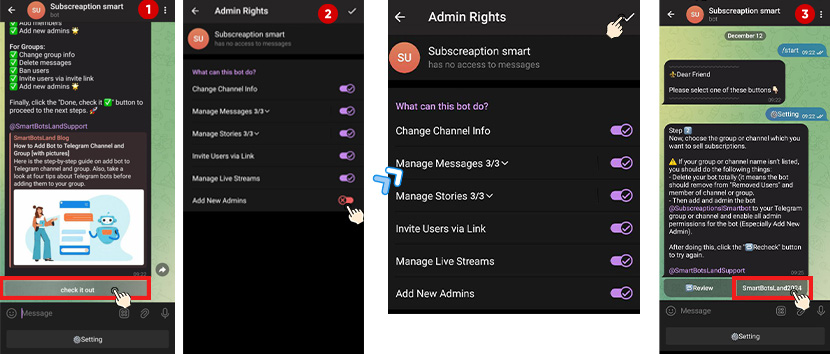
2. Add the bot to your group or channel.
- To begin, add your bot to your private channel or group and promote it to admins. This step is essential for granting the bot the necessary permissions.
- Afterward, click the “Check It Out” button to verify the setup.
Need help? Check out:
How to create your Telegram bot with @Botfather?
3. Select a Group or Channel to Manage.
- You’ll see a list of groups and channels where your bot is a member. Select the one you want to manage.
Note: Each subscription bot can manage only one private group or channel.
5. Set Payment Methods.
Then click “Continue” and choose how users should pay for the membership.
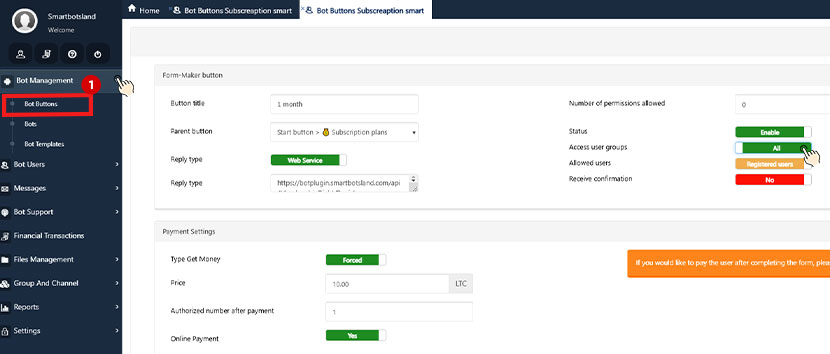
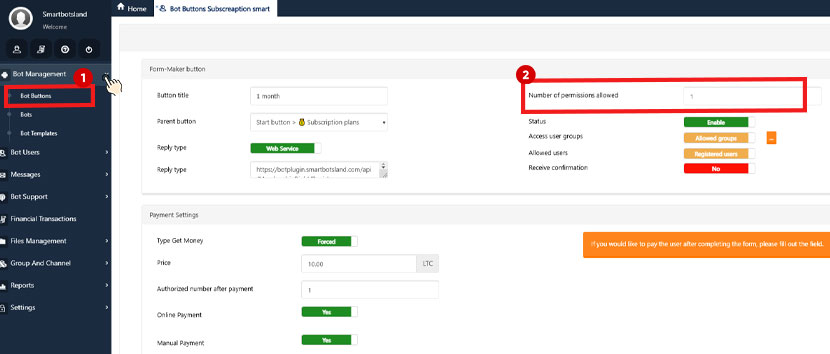
6. Customize Subscription Plans.
- Subsequently, click “Next Level” to continue customizing your subscription plans.
- Then in the new window, fill in:
- Title: Name of the subscription plan.
- Duration: Specify how long users can access your content (e.g., days, weeks, or months).
- Price: Set the amount users need to pay for each plan.
7. Save and finalize.
- Once you’ve customized your plans, click “SAVE & BACK TO BOT” to finalize your settings.

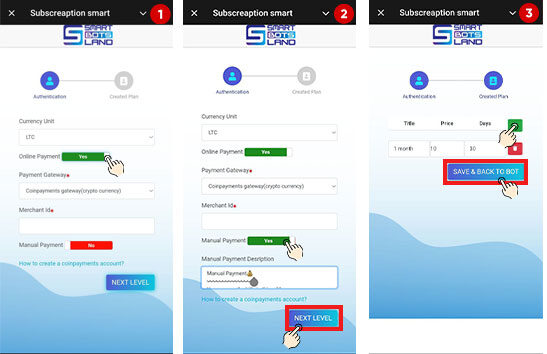
Tip: Add a free plan to let users access your content for free for a limited time. Once the free period ends, they’ll need to pay to continue using your content.
The Subscription bot Template Menu
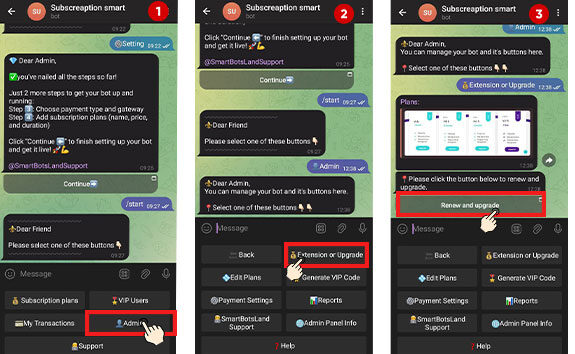
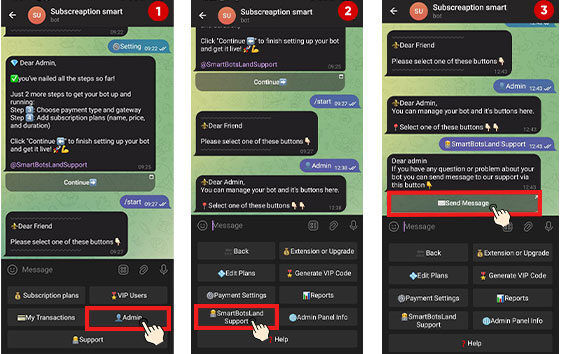
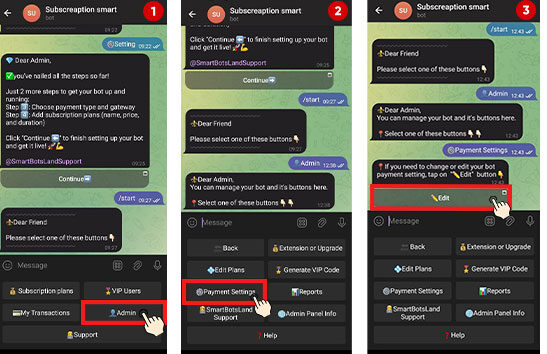
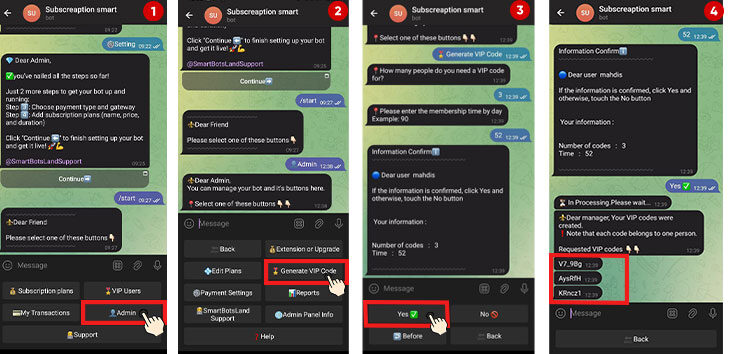
As the bot owner, you will see the ‘Admin‘ button. So when you click on the ‘Admin‘ button, you’ll find several sub-buttons that provide various management options.
- 💰Extension or Upgrade: Use this button to upgrade your bot after your 7-day free trial.

- 🧑💻SmartBotsLand Support: For assistance, click the Support button to contact our team. We’re here to help you!

- ⚙️Payment Settings: Use the Payment Settings button to choose your currency and payment method. You can use CoinPayments for online transactions or set up manual payments where users send you payment receipts for approval.

- 🌐Admin Panel Info: By clicking on this button, you can get your login information.

- 🎖 Generate VIP Code: Create VIP codes for special customers to grant temporary free access to your content and products.

- 💠Edit Plans: Use this button to edit or delete the plans you have created before.

- 📊Reports: You can receive the reports of your channel members (those who have received the subscription link from your bot and have become a member of your channel) and the list of users’ transactions.


Managing & Customizing Your Subscription Plans
As the bot owner, you’ll see an ‘Admin’ button in your bot menu. Tap on it to access several management tools for your subscription bot.
Edit Plans:
To update or delete your existing subscription plans:
-
Tap on the “Admin” button.
-
Choose “Edit Plans.”
Here you can easily change plan details or remove any plan you no longer need.
Customize Your Plans
Want more control over how users access your plans? Here’s what you can do:
-
Ask Users to Sign Up First
Your customers must first sign up in your bot and then select a plan.
-
- Then, enable the “Sign Up” button in your bot settings.

-
- Add your desired question as the registration question for new users.

- Add your desired question as the registration question for new users.
-
- Adjust your plan settings to make them available only for registered users.
- Adjust your plan settings to make them available only for registered users.
More information:
How do I activate the sign-up button in your bot?
-
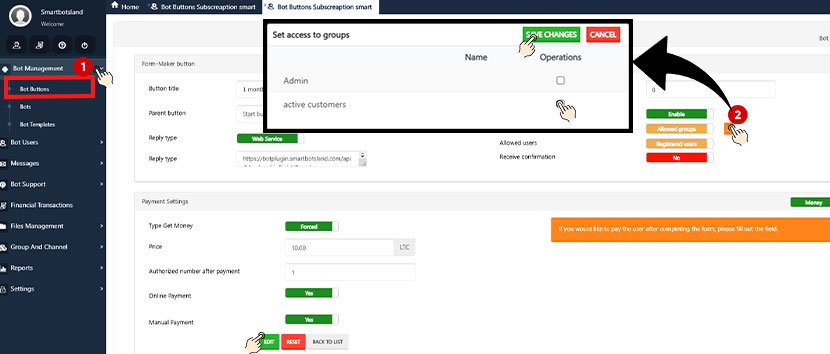
Restrict Access to Certain Plans
If you want only specific users to access your plans, follow these steps:
-
- Create user groups based on your desired criteria (e.g., VIP members, active customers).
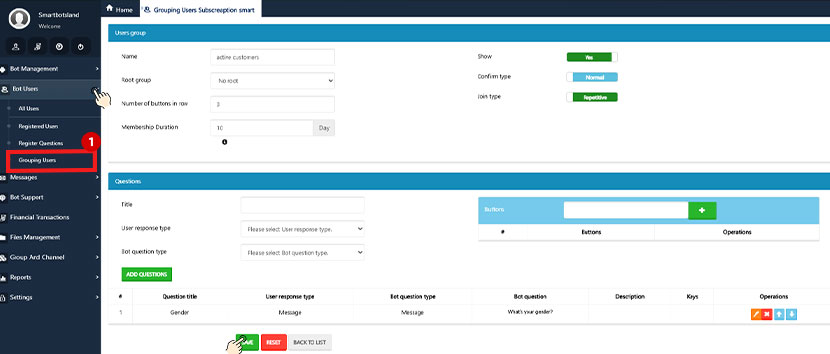
-
- Set the bot’s buttons or specific plans to be accessible only to selected user groups.
More information:
How do I activate a user group in your bot?
-
One-Time Plan Access
You can limit customers to getting a plan just once.
Important Tips
- You can only edit subscription plans or payment gateways directly within the bot, ensuring that all changes are made securely and efficiently.
- To provide a premium experience for special users, you can make use of the VIP Code feature, which allows you to offer temporary access to select customers.
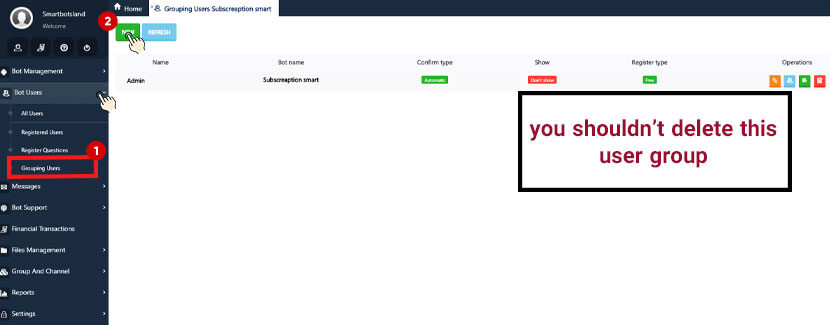
- In order to keep your VIP content exclusive to paid members, it is crucial that you do not delete the Assistant Bot from your private channels or groups. This step ensures the subscription system continues to function securely.
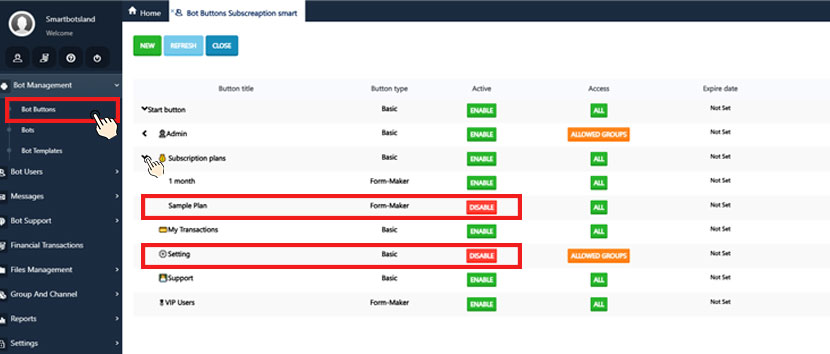
- For smooth operation, make sure not to delete the Sample button in your admin panel. Additionally, avoid activating the Setting button in your admin panel, as it may lead to unintended changes.
Deleting the Assistant Bot from Channels and Groups
When you add a subscription bot to your group or channel, an assistant bot is automatically added as well. This bot plays a crucial role in managing your channel’s security and subscription system:
- It prevents unauthorized access.
- The Assistant Bot ensures that only users who have subscribed via your bot can join your group or channel. Moreover, it actively monitors subscription statuses.
- It monitors subscription expiry.
- In addition, the bot automatically removes users from the channel when their subscription expires, ensuring that only active members remain.
SmartBotsLand Payment Methods
CoinPayments Gateway (Automated)
- If you have a CoinPayments Merchant ID, you can activate it in the SmartBotsLand panel for seamless cryptocurrency payments.
- Your customers can pay instantly, and their orders will be processed automatically.
How to Set Up CoinPayments:
- Get your Merchant ID from CoinPayments.
- Enter it in the SmartBotsLand payment settings.
- Save the settings, and you’re ready to accept crypto payments!
Manual Payment (Custom Payments)
If you don’t use CoinPayments, you can enable Manual Payment to accept transactions through PayPal, bank transfers, or other methods.
How It Works:
- Customer Places an Order:
The customer selects their items and chooses “Manual Payment” as the payment method at checkout. - Payment Details Provided:
Then the system displays instructions for manual payment, such as bank account details, a payment reference code, or other required information. - Customer Makes the Payment:
After that, the customer transfers the payment through the specified method (e.g., bank app, cash deposit, etc.). - Proof of Payment Submitted:
Finally, the customer uploads proof of payment (like a receipt or transaction ID) via the platform or sends it to the seller through the specified communication channel.
- Seller Verifies the Payment:
The seller checks their records or bank account to confirm the payment. - Order Confirmation:
Once the payment is verified, the seller marks the order as “Paid,” and the order processing continues (e.g., shipping, access to digital products).
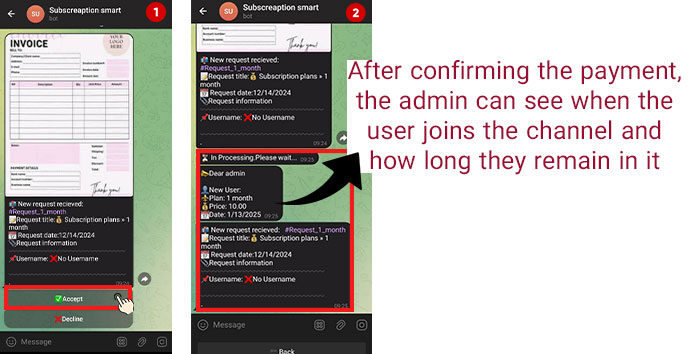
This method is useful in scenarios where automatic payment gateways aren’t available or preferred.
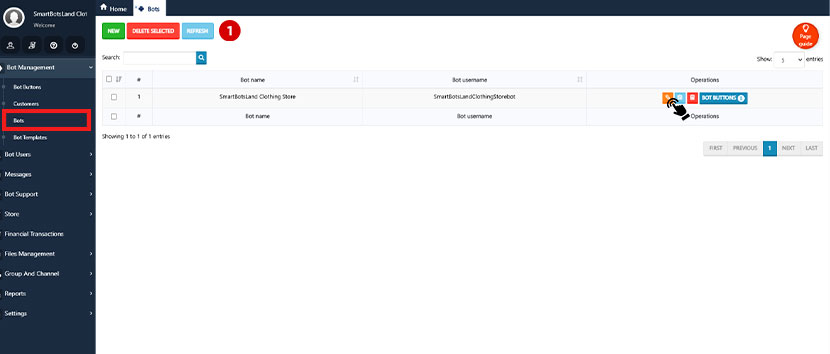
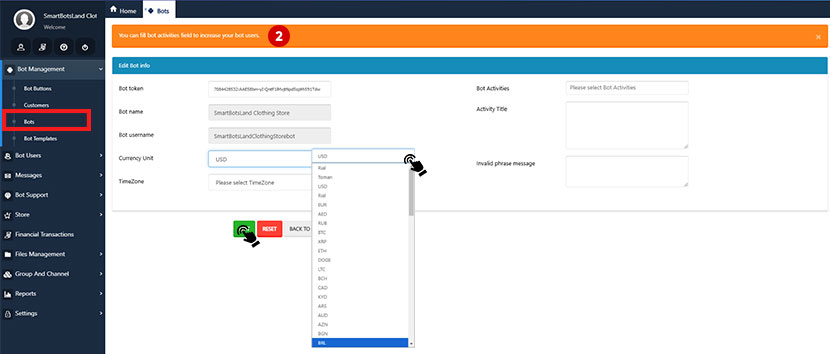
Currency Options
-
You can easily set your preferred currency by following these steps:
- First, go to your “Admin Panel (Dashboard).
- And from the “Bot Management” menu, select “Bots.“.
- Then click the “Edit” icon next to your bot’s name.
- Finally, in the “Currency” section, choose your desired currency.
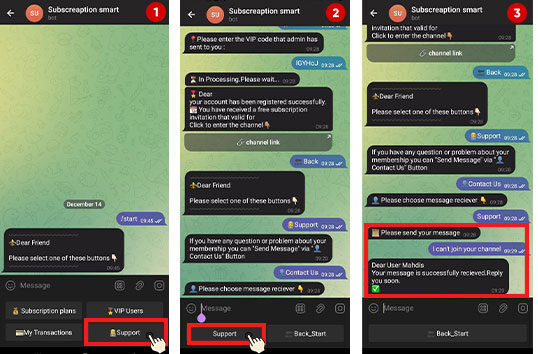
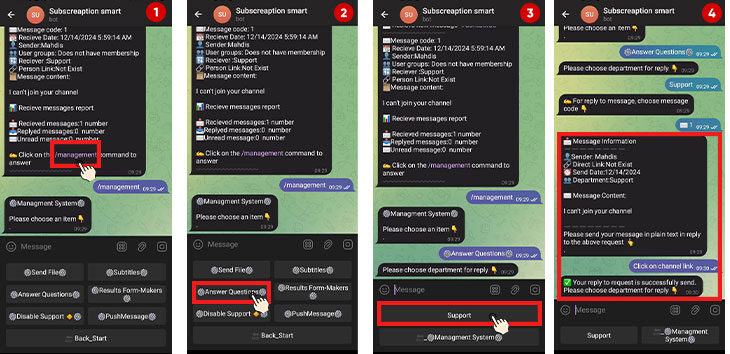
The Support button helps your customers reach out to you easily whenever they have questions or need help.
-
When customers tap the Support (or Contact Us) button in your subscription bot, they can send you a message directly.
-
Their message will be delivered to you (the admin), and you can reply to assist them.
-
It ensures a smooth and direct communication channel between you and your subscribers.
✅ This feature helps you build trust and provide better service
-
How It Works:
- Customers can send messages or questions directly to you through this button.

- Then, you can respond to their inquiries promptly, ensuring a seamless support experience.

- Customers can send messages or questions directly to you through this button.
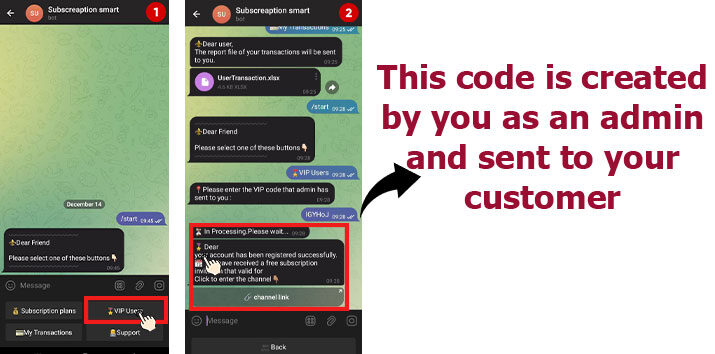
VIP Users:
VIP codes are for special customers (VIP Users) to grant temporary free access to your content and products.
- Send a Request to Admin
- Users can send a request through the bot to obtain a VIP code.
- Admin Generates the Code
- Then, the admin creates a special VIP code with a custom duration, allowing the user to access the VIP channel for free for a limited time.
- Join VIP Channel for Free
- Finally, the user enters the VIP code; they can enjoy the selected plan and join your VIP channel or group without any payment.
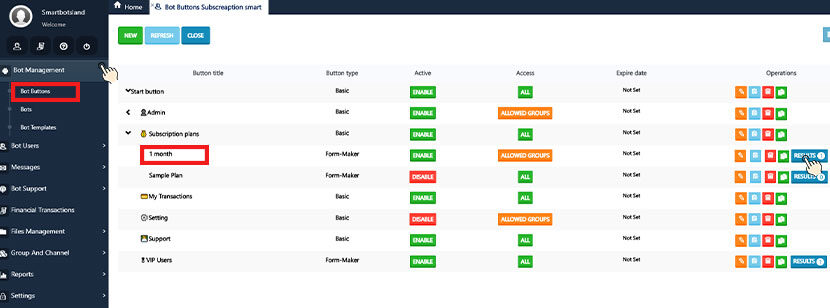
To add recipients to your subscription plan, follow these steps:
-
- Enter your admin panel. From the Bot Management menu, click on “Bot Buttons.”
- Next, click on the “💰 Subscription Plans” button and select your desired plan.
- Then, click on the “edit” icon next to your chosen plan.
- And in the Recipients section, you can add your desired recipients.

More information:
How define an operator in your bot?
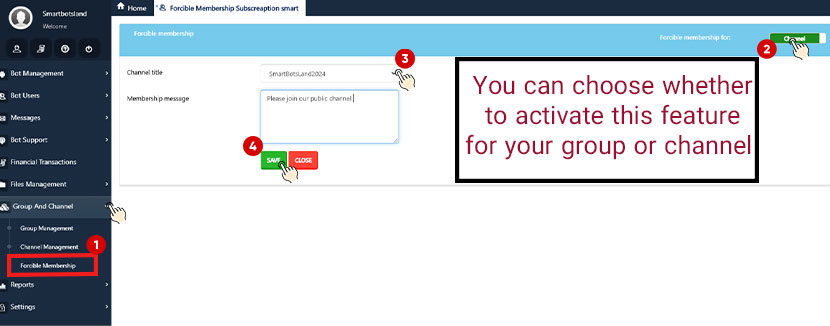
Join the public group/Channel
Customers are required to join your public group or channel before they can use the bot.
-
- Add your bot as an admin to your desired group or channel. This is necessary for the bot to verify memberships.
- And enable the “Forcible Membership” feature from your admin panel, and specify the link to your group or channel.
- When a customer interacts with the bot for the first time or tries to use its buttons, the bot automatically checks if they’ve joined the specified group or channel.
- Then, if the customer has joined your group or channel, they can proceed to use the bot’s features. Otherwise, the bot will prompt them to join first.
More information:
How do I enable forced membership in your bot?
When your customers send /start in your bot, they’ll see these buttons:
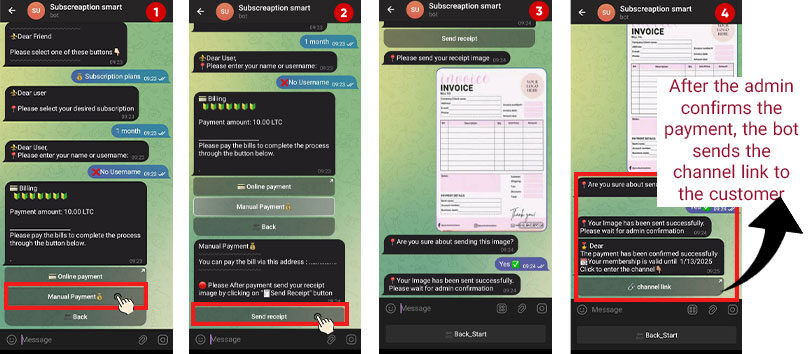
1. 💰 Subscription plans:
- First, customers can view and choose a plan that suits their needs.
- Once they select a plan, they’ll answer a few questions from the bot.
- They can pay using the methods you’ve set up, such as online gateways or manual payments.
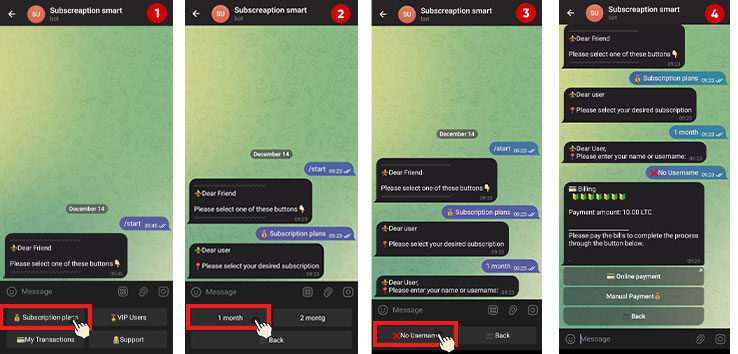
- After payment, the bot sends them a unique link to join your VIP channel or group.
- Additionally, the bot reminds them that their plan is about to expire. (3,1 days before expiration)
- If they don’t renew their plan, the bot automatically removes them from the channel/group once their subscription expires.
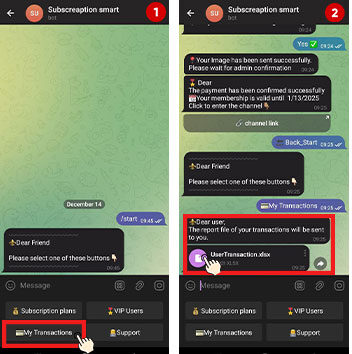
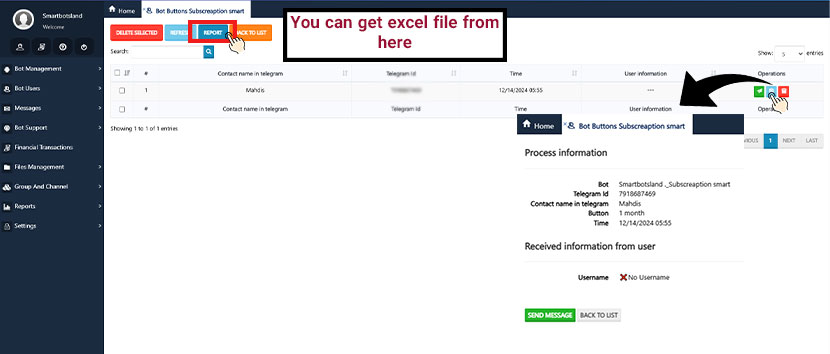
2. 💳My Transactions:
Customers can download a detailed report of their transactions, and the report includes:
- A summary of all payments completed.
- Information like the price and duration of each plan.
- Clear visibility of when each subscription will end.
- And the total number of subscriptions purchased.
3. 🎖VIP Users:
- Send a Request to Admin
- Users can send a request through the bot to obtain a VIP code.
- Admin Generates the Code
- Then, the admin creates a special VIP code with a custom duration, allowing the user to access the VIP channel for free for a limited time.
- Join VIP Channel for Free
- Finally, the user enters the VIP code; they can enjoy the selected plan and join your VIP channel or group without any payment.
👨💻Support:
The Support button in your subscription bot allows customers to easily communicate with you.
- How It Works:
- Customers can send messages or questions directly to you through this button.
- Then, you can respond to their inquiries promptly, ensuring a seamless support experience.
- Customers can send messages or questions directly to you through this button.
You can fully personalize your bot by changing all messages and button texts!
Follow these simple steps to update them:
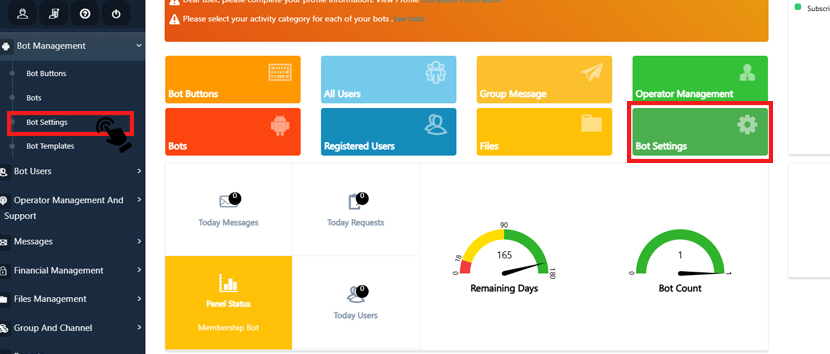
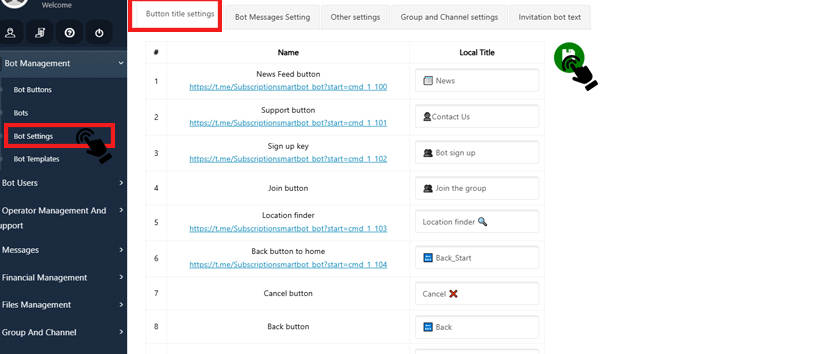
- Enter Your Admin Panel
- Go to “Bot Management” and select “Bot Settings”
- Choose either:
🔹 “Button Title Setting” – To edit button texts
🔹 “Bot Messages Setting” – To update messages - Click the Green Save Button ✅ to apply your changes
As the bot owner, you will see the ‘Admin‘ button. So when you click on the ‘Admin‘ button, you’ll find several sub-buttons that provide various management options.
Reports: You can receive the reports of your channel members (those who have received the subscription link from your bot and have become a member of your channel) and the list of users’ transactions.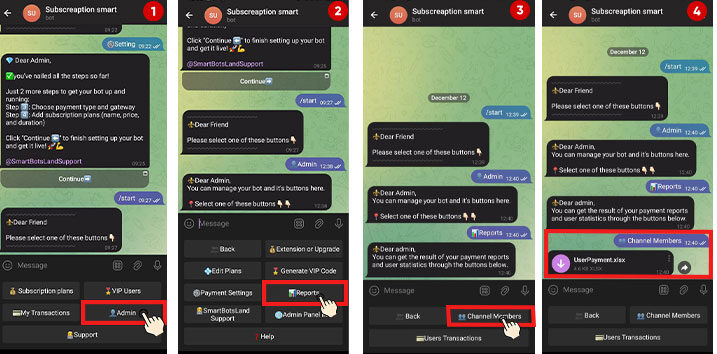
Need help? Check out:
How do I get a different report from the SmartBotsLand Panel?
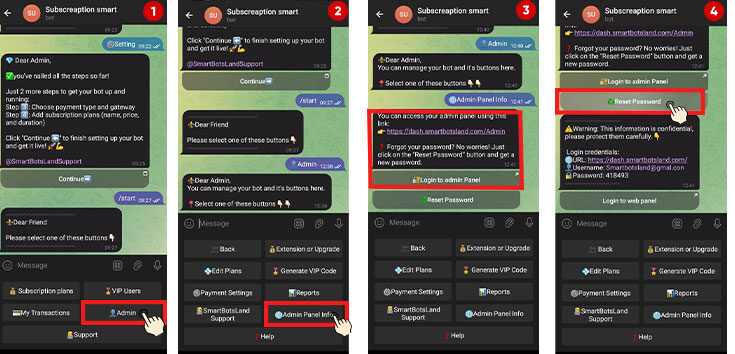
You can control and customize your channel/group directly from your bot. But for advanced settings and a more professional setup, you’ll need to access your Admin Panel.
How to Enter Your Admin Panel?
- Send “/start” in your bot
- Click on “Admin” button
- Select “Admin Panel Info.”
Forgot your password?
No worries! Just click “Reset Password,” and a new password will be sent to your email.
Create and Manage a Subscription Bot with SmartBotsLand! 🚀
You can control and customize your channel/group directly from your bot. But for advanced settings and a more professional setup, you’ll need to access your Admin Panel.
How to Enter Your Admin Panel?
- Send “/start” in your bot
- Click on “Admin” button
- Select “Admin Panel Info.”
Forgot your password?
No worries! Just click “Reset Password,” and a new password will be sent to your email.
As the bot owner, you will see the ‘Admin‘ button. So when you click on the ‘Admin‘ button, you’ll find several sub-buttons that provide various management options.
Reports: You can receive the reports of your channel members (those who have received the subscription link from your bot and have become a member of your channel) and the list of users’ transactions.
Need help? Check out:
How do I get a different report from the SmartBotsLand Panel?
You can fully personalize your bot by changing all messages and button texts!
Follow these simple steps to update them:
- Enter Your Admin Panel
- Go to “Bot Management” and select “Bot Settings”
- Choose either:
🔹 “Button Title Setting” – To edit button texts
🔹 “Bot Messages Setting” – To update messages - Click the Green Save Button ✅ to apply your changes
When your customers send /start in your bot, they’ll see these buttons:
1. 💰 Subscription plans:
- First, customers can view and choose a plan that suits their needs.
- Once they select a plan, they’ll answer a few questions from the bot.
- They can pay using the methods you’ve set up, such as online gateways or manual payments.
- After payment, the bot sends them a unique link to join your VIP channel or group.
- Additionally, the bot reminds them that their plan is about to expire. (3,1 days before expiration)
- If they don’t renew their plan, the bot automatically removes them from the channel/group once their subscription expires.
2. 💳My Transactions:
Customers can download a detailed report of their transactions, and the report includes:
- A summary of all payments completed.
- Information like the price and duration of each plan.
- Clear visibility of when each subscription will end.
- And the total number of subscriptions purchased.
3. 🎖VIP Users:
- Send a Request to Admin
- Users can send a request through the bot to obtain a VIP code.
- Admin Generates the Code
- Then, the admin creates a special VIP code with a custom duration, allowing the user to access the VIP channel for free for a limited time.
- Join VIP Channel for Free
- Finally, the user enters the VIP code; they can enjoy the selected plan and join your VIP channel or group without any payment.
👨💻Support:
The Support button in your subscription bot allows customers to easily communicate with you.
- How It Works:
- Customers can send messages or questions directly to you through this button.
- Then, you can respond to their inquiries promptly, ensuring a seamless support experience.
- Customers can send messages or questions directly to you through this button.
Join the public group/Channel
Customers are required to join your public group or channel before they can use the bot.
-
- Add your bot as an admin to your desired group or channel. This is necessary for the bot to verify memberships.
- And enable the “Forcible Membership” feature from your admin panel, and specify the link to your group or channel.
- When a customer interacts with the bot for the first time or tries to use its buttons, the bot automatically checks if they’ve joined the specified group or channel.
- Then, if the customer has joined your group or channel, they can proceed to use the bot’s features. Otherwise, the bot will prompt them to join first.
More information:
How do I enable forced membership in your bot?
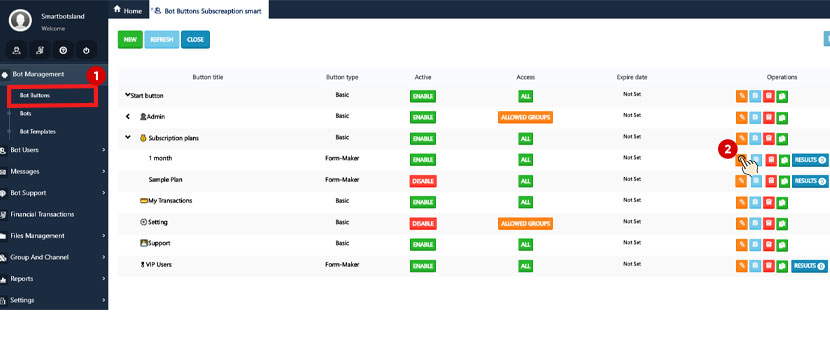
To add recipients to your subscription plan, follow these steps:
-
- Enter your admin panel. From the Bot Management menu, click on “Bot Buttons.”
- Next, click on the “💰 Subscription Plans” button and select your desired plan.
- Then, click on the “edit” icon next to your chosen plan.
- And in the Recipients section, you can add your desired recipients.
More information:
How define an operator in your bot?
VIP Users:
VIP codes are for special customers (VIP Users) to grant temporary free access to your content and products.
- Send a Request to Admin
- Users can send a request through the bot to obtain a VIP code.
- Admin Generates the Code
- Then, the admin creates a special VIP code with a custom duration, allowing the user to access the VIP channel for free for a limited time.
- Join VIP Channel for Free
- Finally, the user enters the VIP code; they can enjoy the selected plan and join your VIP channel or group without any payment.
The Support button helps your customers reach out to you easily whenever they have questions or need help.
-
When customers tap the Support (or Contact Us) button in your subscription bot, they can send you a message directly.
-
Their message will be delivered to you (the admin), and you can reply to assist them.
-
It ensures a smooth and direct communication channel between you and your subscribers.
✅ This feature helps you build trust and provide better service
-
How It Works:
- Customers can send messages or questions directly to you through this button.
- Then, you can respond to their inquiries promptly, ensuring a seamless support experience.
- Customers can send messages or questions directly to you through this button.
Currency Options
You can set your preferred currency in two ways:
- Through Your Bot
- Through Your Admin Panel
Admin Panel
You can easily set your preferred currency by following these steps:
-
- First, go to your “Admin Panel (Dashboard).
- And from the “Bot Management” menu, select “Bots.”
- Then click the “Edit” icon next to your bot’s name.
- Finally, in the “Currency” section, choose your desired currency.
Bot
As the bot owner, you will see the ‘Admin‘ button. So when you click on the ‘Admin‘ button, you’ll find several sub-buttons that provide various management options.
⚙️Payment Settings: Use the Payment Settings button to choose your currency.
SmartBotsLand Payment Methods
CoinPayments Gateway (Automated)
- If you have a CoinPayments Merchant ID, you can activate it in the SmartBotsLand panel for seamless cryptocurrency payments.
- Your customers can pay instantly, and their orders will be processed automatically.
How to Set Up CoinPayments:
- Get your Merchant ID from CoinPayments.
- Enter it in the SmartBotsLand payment settings.
- Save the settings, and you’re ready to accept crypto payments!
Manual Payment (Custom Payments)
If you don’t use CoinPayments, you can enable Manual Payment to accept transactions through PayPal, bank transfers, or other methods.
How It Works:
- Customer Places an Order:
The customer selects their items and chooses “Manual Payment” as the payment method at checkout. - Payment Details Provided:
Then the system displays instructions for manual payment, such as bank account details, a payment reference code, or other required information. - Customer Makes the Payment:
After that, the customer transfers the payment through the specified method (e.g., bank app, cash deposit, etc.). - Proof of Payment Submitted:
Finally, the customer uploads proof of payment (like a receipt or transaction ID) via the platform or sends it to the seller through the specified communication channel. - Seller Verifies the Payment:
The seller checks their records or bank account to confirm the payment. - Order Confirmation:
Once the payment is verified, the seller marks the order as “Paid,” and the order processing continues (e.g., shipping, access to digital products).
This method is useful in scenarios where automatic payment gateways aren’t available or preferred.
Important Tips
- You can only edit subscription plans or payment gateways directly within the bot, ensuring that all changes are made securely and efficiently.
- To provide a premium experience for special users, you can make use of the VIP Code feature, which allows you to offer temporary access to select customers.
- In order to keep your VIP content exclusive to paid members, it is crucial that you do not delete the Assistant Bot from your private channels or groups. This step ensures the subscription system continues to function securely.
- For smooth operation, make sure not to delete the Sample button in your admin panel. Additionally, avoid activating the Setting button in your admin panel, as it may lead to unintended changes.
Deleting the Assistant Bot from Channels and Groups
When you add a subscription bot to your group or channel, an assistant bot is automatically added as well. This bot plays a crucial role in managing your channel’s security and subscription system:
- It prevents unauthorized access.
- The Assistant Bot ensures that only users who have subscribed via your bot can join your group or channel. Moreover, it actively monitors subscription statuses.
- It monitors subscription expiry.
- In addition, the bot automatically removes users from the channel when their subscription expires, ensuring that only active members remain.
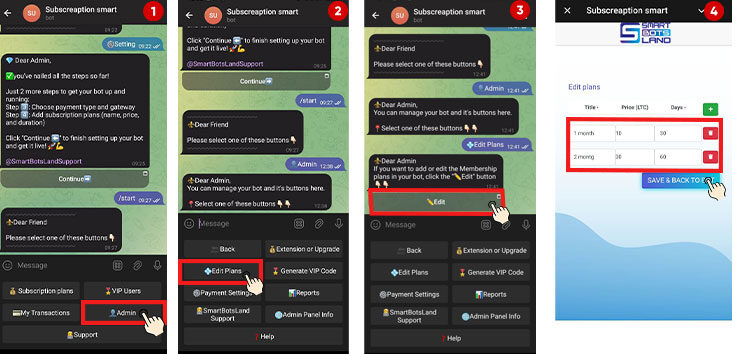
Managing & Customizing Your Subscription Plans
As the bot owner, you’ll see an ‘Admin’ button in your bot menu. Tap on it to access several management tools for your subscription bot.
Edit Plans:
To update or delete your existing subscription plans:
-
Tap on the “Admin” button.
-
Choose “Edit Plans.”
Here you can easily change plan details or remove any plan you no longer need.
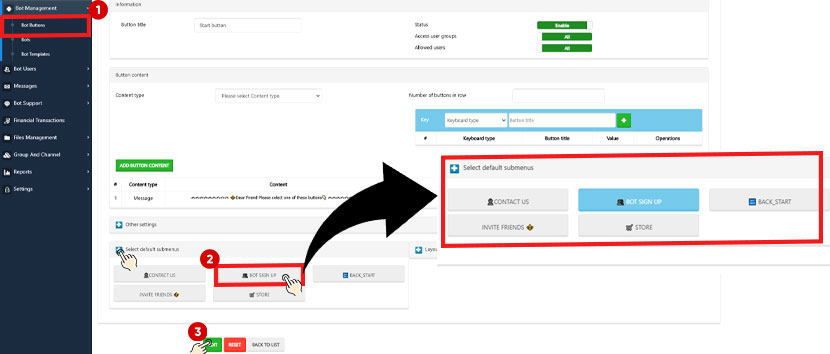
Customize Your Plans
Want more control over how users access your plans? Here’s what you can do:
-
Ask Users to Sign Up First
Your customers must first sign up in your bot and then select a plan.
-
- Then, enable the “Sign Up” button in your bot settings.
-
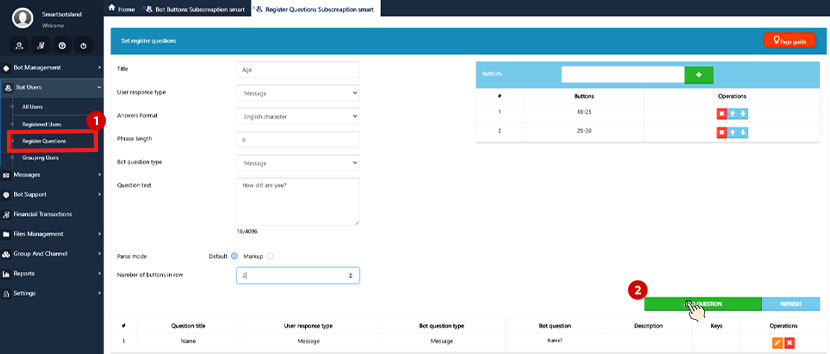
- Add your desired question as the registration question for new users.
- Add your desired question as the registration question for new users.
-
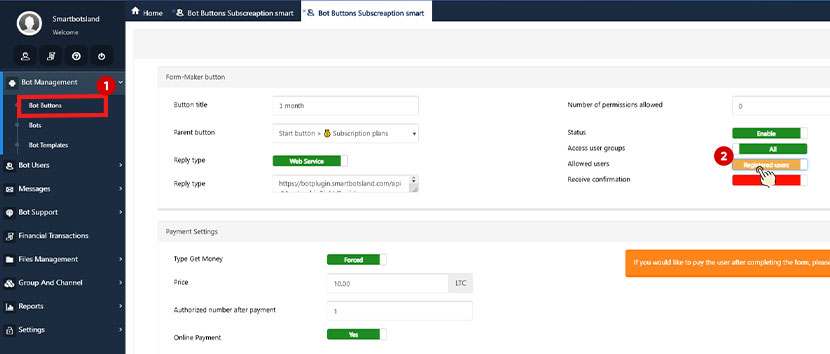
- Adjust your plan settings to make them available only for registered users.
- Adjust your plan settings to make them available only for registered users.
More information:
How do I activate the sign-up button in your bot?
-
Restrict Access to Certain Plans
If you want only specific users to access your plans, follow these steps:
-
- Create user groups based on your desired criteria (e.g., VIP members, active customers).
-
- Set the bot’s buttons or specific plans to be accessible only to selected user groups.
More information:
How do I activate a user group in your bot?
-
One-Time Plan Access
You can limit customers to getting a plan just once.
The Subscription bot Template Menu
As the bot owner, you will see the ‘Admin‘ button. So when you click on the ‘Admin‘ button, you’ll find several sub-buttons that provide various management options.
- 💰Extension or Upgrade: Use this button to upgrade your bot after your 7-day free trial.
- 🧑💻SmartBotsLand Support: For assistance, click the Support button to contact our team. We’re here to help you!
- ⚙️Payment Settings: Use the Payment Settings button to choose your currency and payment method. You can use CoinPayments for online transactions or set up manual payments where users send you payment receipts for approval.
- 🌐Admin Panel Info: By clicking on this button, you can get your login information.
- 🎖 Generate VIP Code: Create VIP codes for special customers to grant temporary free access to your content and products.
- 💠Edit Plans: Use this button to edit or delete the plans you have created before.
- 📊Reports: You can receive the reports of your channel members (those who have received the subscription link from your bot and have become a member of your channel) and the list of users’ transactions.
How do I set up a subscription bot?
1. First of all, click the “Setting” button.
2. Add the bot to your group or channel.
- To begin, add your bot to your private channel or group and promote it to admins. This step is essential for granting the bot the necessary permissions.
- Afterward, click the “Check It Out” button to verify the setup.
Need help? Check out:
How to create your Telegram bot with @Botfather?
3. Select a Group or Channel to Manage.
- You’ll see a list of groups and channels where your bot is a member. Select the one you want to manage.
Note: Each subscription bot can manage only one private group or channel.
5. Set Payment Methods.
Then click “Continue” and choose how users should pay for the membership.
6. Customize Subscription Plans.
- Subsequently, click “Next Level” to continue customizing your subscription plans.
- Then in the new window, fill in:
- Title: Name of the subscription plan.
- Duration: Specify how long users can access your content (e.g., days, weeks, or months).
- Price: Set the amount users need to pay for each plan.
7. Save and finalize.
- Once you’ve customized your plans, click “SAVE & BACK TO BOT” to finalize your settings.
Tip: Add a free plan to let users access your content for free for a limited time. Once the free period ends, they’ll need to pay to continue using your content.
How do I create a subscription bot?
1. First of all, to get started, you should launch the SmartBotsLand bot.
2. Next, choose “🚀 Create Bot” to proceed with the setup.
3. After that, click on the “💵 Create Subscription Bot” button.
4. Next, click on the “Subscription Bot” button.
4. Enter the bot token you got from @Botfather.
Need help? Check out:
How to create your Telegram bot with @Botfather?
5. In the next step, you should answer these questions:
- First, enter your full name.
- Then, provide a valid email address.
- Finally, select your country.
6. Finally, click “Start Your Bot” to complete the setup.
Looking to monetize your Telegram channel or group? With the Subscription bot from SmartBotsLand, you can easily set up subscription plans, manage members, and ensure a secure environment for your community.
Why Choose SmartBotsLand for Telegram Membership Management?
1. Easy Subscription Management
Set up automated membership plans for your Telegram channels and groups in just a few clicks! No manual work—everything runs smoothly.
2. Secure and Reliable
We keep your community safe by ensuring that only paying members stay in your group. Users who don’t renew are automatically removed—no extra effort needed!
3. Multiple Payment Options
Accept payments from various gateways, making it easy for members to subscribe and renew.
4. Full Automation & Customization
From subscription reminders to member management, everything is automated! Plus, you can customize settings based on your needs.
What You’ll Find in This Tutorial?
✅ Create subscription plans that suit your members.
✅ Automatically manage members and renewals.
✅ Keep your channel safe by blocking unauthorized users.
Whether you have a private channel, an exclusive group, or share premium content, this guide will help you turn your Telegram into a successful subscription-based community.

i have oen bot libre taxi.org
i want used a subscription and payment bot to this service
your platform is ok for this ?
i send to your support telegram channel but no answer
Dear friend the answer to your request has been sent in Telegram, please check
[…] How to Create a Subscription Bot? […]