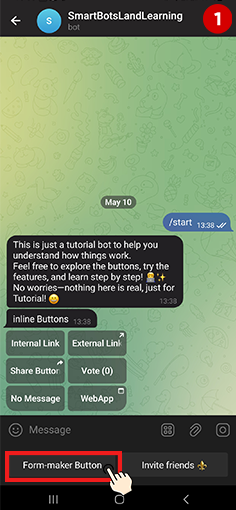
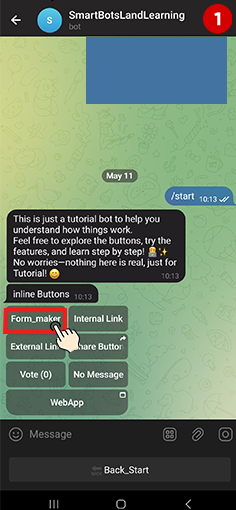
What Is the Form Maker Button in SmartBotsLand?
One of the most powerful features in the SmartBotsLand bot maker is the “Form Maker button.” It allows you to create interactive forms that collect information from users inside your Telegram bot.
Whether you’re registering users for an event, collecting orders for your restaurant, gathering customer feedback, or even wanting to collect orders for your shop—this button is what you need!
When Should You Use the Form Maker Button?
Use the Form Maker button when you want to:
- Get user information through custom questions
- Create a registration form (e.g., course sign-up)
- Accept food orders or service requests
- Collect feedback, complaints, or suggestions
- Gather necessary data before a payment is processed
It’s perfect for any case where multiple questions need to be asked and responses saved.
Why Use the Form Maker Button?
Because it’s:
- Simple to use (no coding needed)
- Highly customizable (question types, visibility, access control)
- Works perfectly in Telegram’s environment
- Supports payments and file uploads
- Great for both developers and non-developers
How the Form Maker Button Works
This button opens a custom form inside your Telegram bot. You define the questions, response types (text, photo, audio, etc.), and who can see the form. Once users submit their responses, you can:
- Show a confirmation message
- Send the data to a web service
- Receive responses directly in your operator panel
- Even request a payment at the end!
How to Create a Form Maker Button
Here’s a step-by-step guide:
- First, register your bot with @BotFather
- Then, log into the SmartBotsLand admin panel
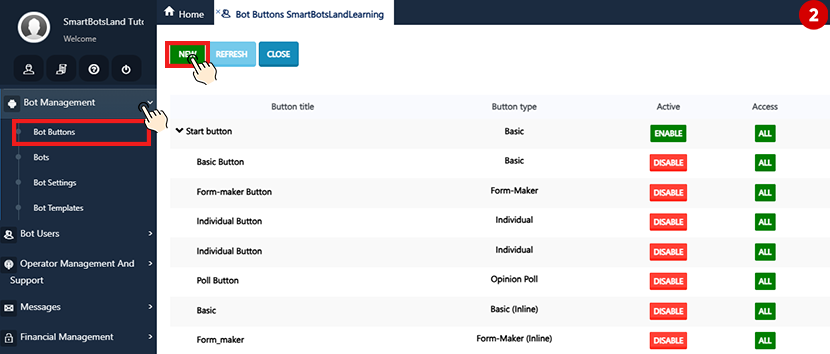
- From the dashboard, go to Bot Buttons

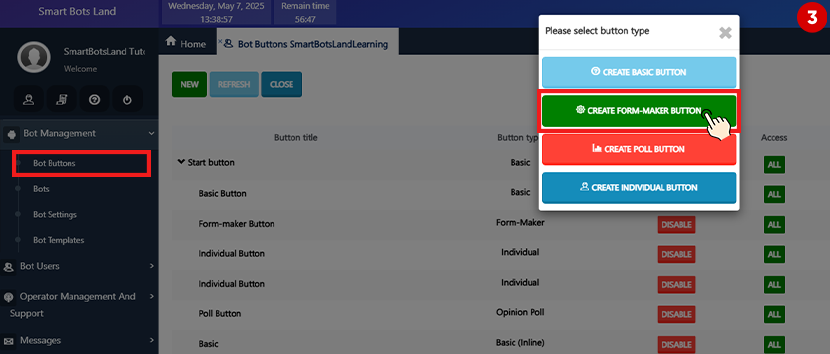
- Click on “NEW,” then choose “CREATE FORM MAKER BUTTON.”
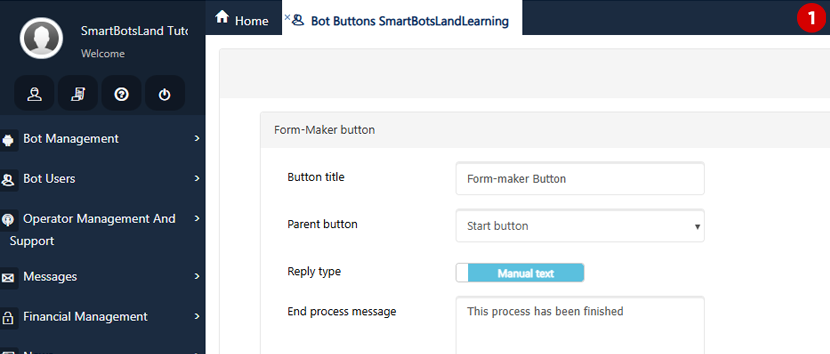
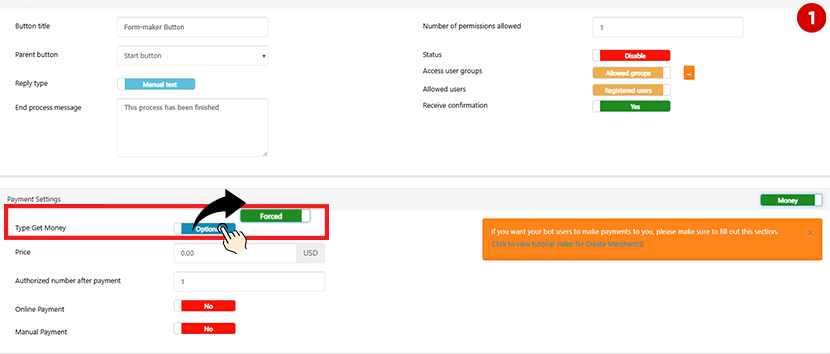
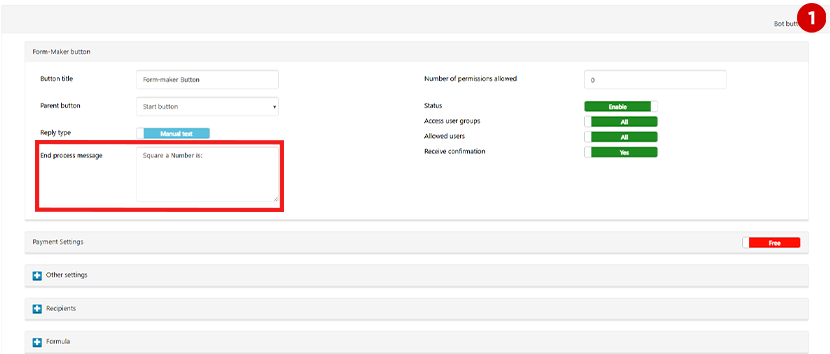
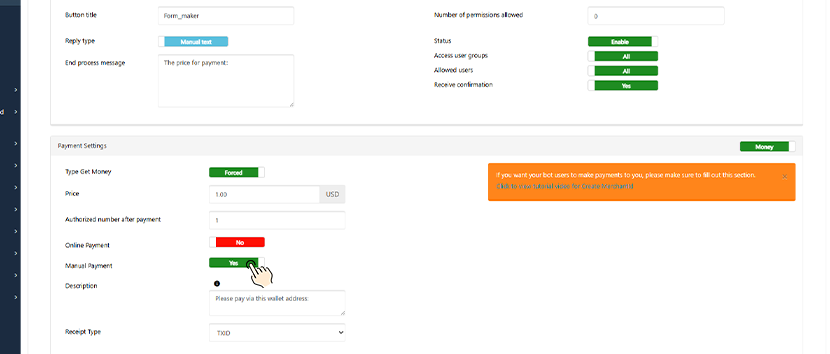
Button Title
Choose a name for your button. For example: Register, Order, or Feedback.
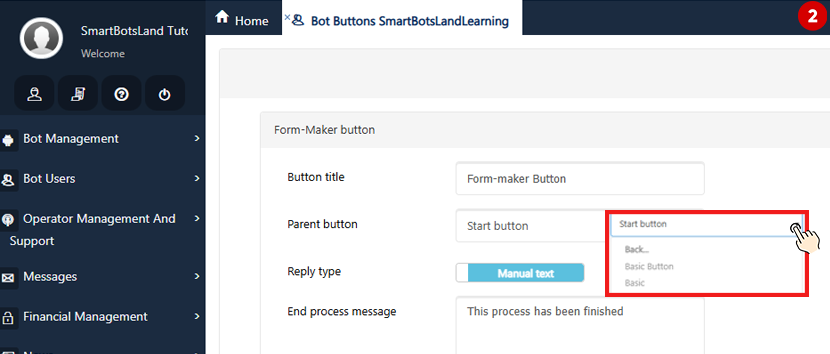
Parent Button
Choose where this button will appear. You can place it in the main menu or under another button.
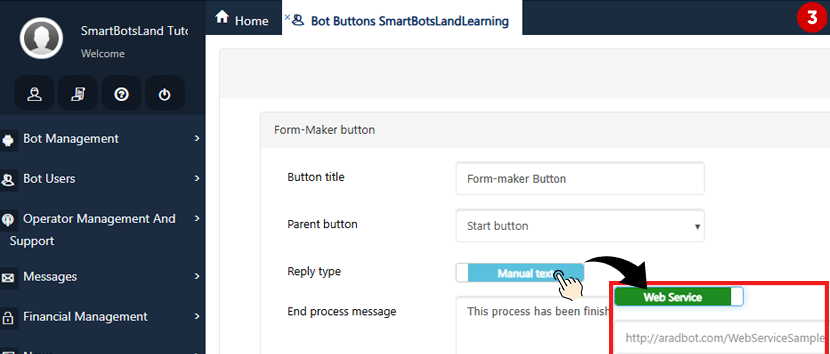
Reply Type
Two options:
- Manual Text—Shows a predefined message to users after they submit the form
- Web Service—Sends data to your custom API endpoint (for developers)
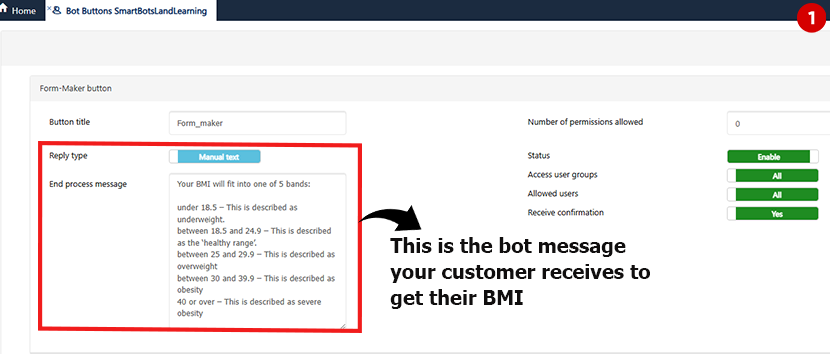
End Process Message
Set a message that will be shown after the form is submitted (e.g., “Thank you for your response!”).
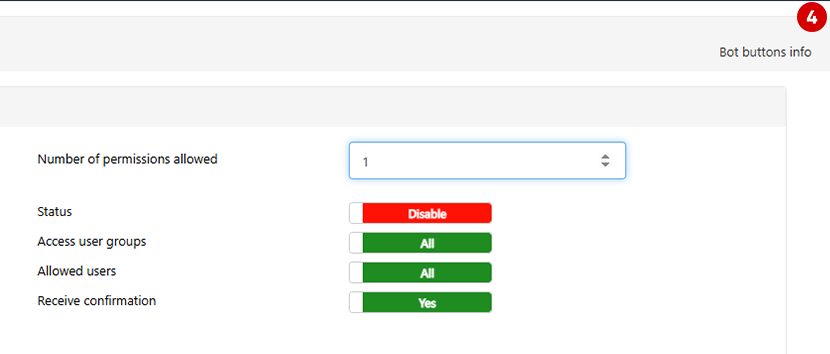
Number of Permissions Allowed
By default, it’s set to 0 (unlimited responses). Change it to 1 if users should only fill out the form once.
Status
- Enabled: All eligible users will see the button
- Disabled: The button will be hidden
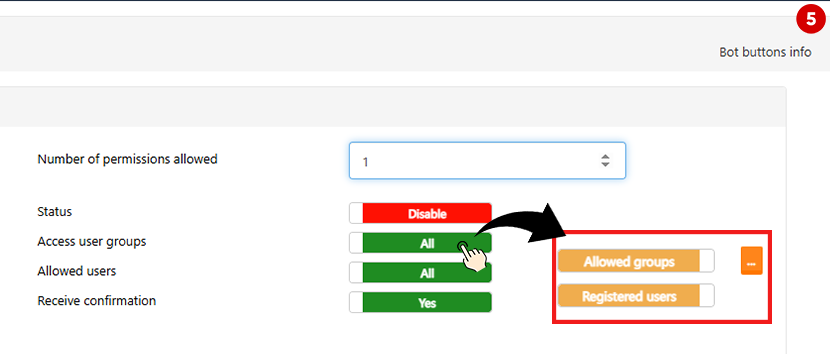
Access: User Groups
Decide who can see the form:
- All: Everyone
- Allowed Groups: Selected user groups only
Related: How to Group Bot users?
Access: Allowed Users
Choose between
- All: Public access
- Registered users: Only users who are already registered
Receive Confirmation
If set to Yes, users will receive a message confirming their form submission.
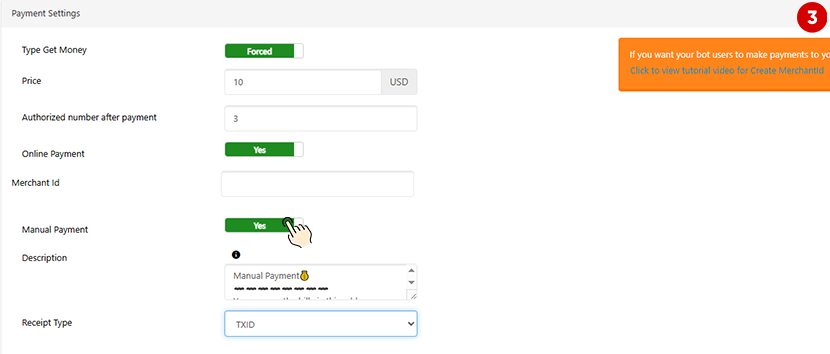
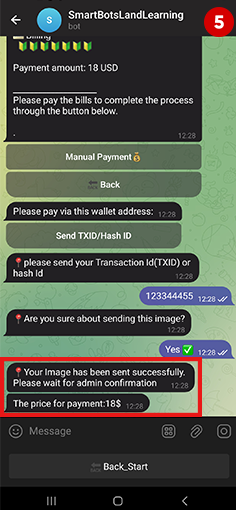
Payment Settings
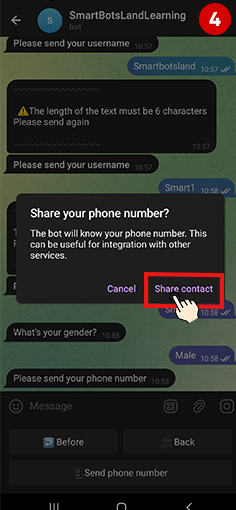
If you want to collect a fee from users—such as for registrations, food orders, or ad placements—you can enable the payment feature in your form.
Here’s how to configure the payment section:
-
Payment Setting: Change this to Money to activate payment for the form.
-
Type Get Money:
-
Set to Forced if users must pay to submit the form.
-
Set to Optional if payment is not required, but users can choose to pay.
-
-
Price: Enter the exact amount you want to charge.
-
Merchant ID: Required for online payments. You can get this from coinpayments.net.
-
Authorized Number After Payment: Limit the number of times each user can submit the form after paying (e.g., 1 submission per payment).
-
Online Payment: Choose your preferred payment gateway (e.g., CoinPayments).
-
Manual Payment: Enable this if you want to allow users to pay manually and upload a receipt.
-
Description: Add a short note about what this payment is for. It will be shown to users during the payment process.
-
Receipt Type: Specify how users should provide their proof of payment — such as uploading a photo, entering a transaction code, etc.
-

Button Size
By default, buttons are set to Large size.
However, we recommend switching to Small size for a cleaner and more compact layout.
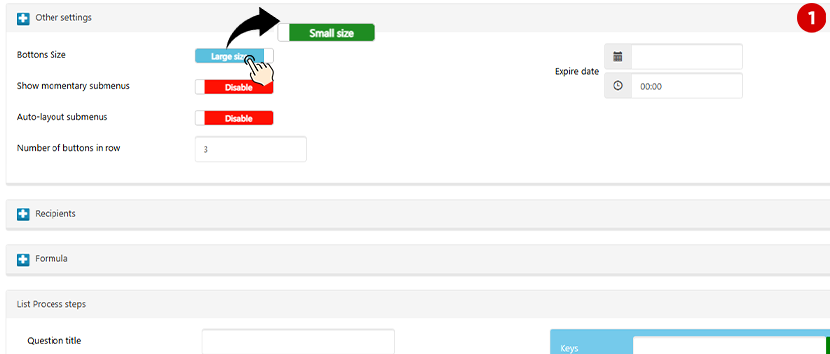
We recommend enabling .
This ensures users can always see the available submenu options without needing to click again, making the form smoother and more interactive.
By default, the button layout (number of buttons per row and their arrangement) is inherited from the root button.
But you can override this by enabling Auto Layout, which automatically arranges buttons for better appearance.
Buttons Per Row
You can control how many buttons appear in a single row.
This helps you create a neat, user-friendly button arrangement.
Expiration Date
Each button can have an expiration date and time.
Once the button expires, it will no longer be shown to users in the bot. This is useful for time-limited offers or scheduled forms.
To ensure that your form responses are handled properly, you’ll need to assign one or more operators to your bot. Operators are the users who will receive form reports and can respond to users if needed.
How to Assign Operators
-
Log in to your admin panel.
-
Go to the “Bot Users” menu and select “All Users.”
-
Find the user you want to assign and click on the “Set Operator” icon in front of their name.
-
That’s it! The user is now an operator and can be selected in the Recipients section of your form button.
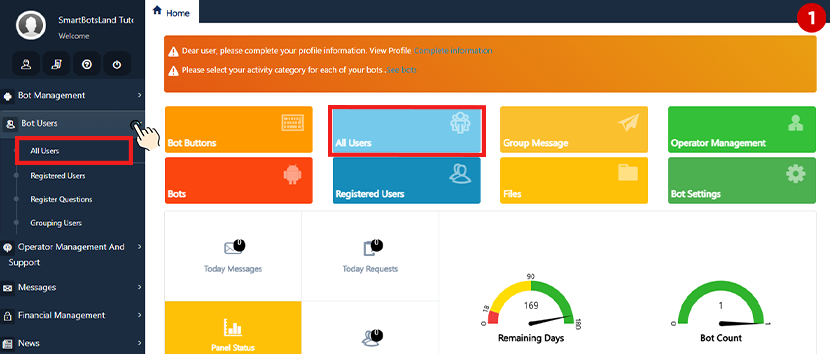
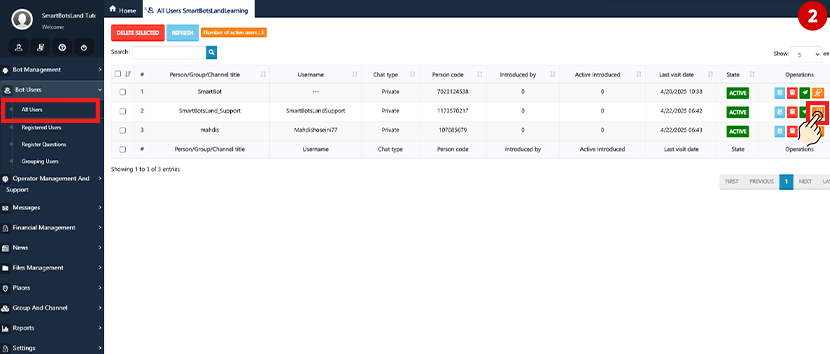
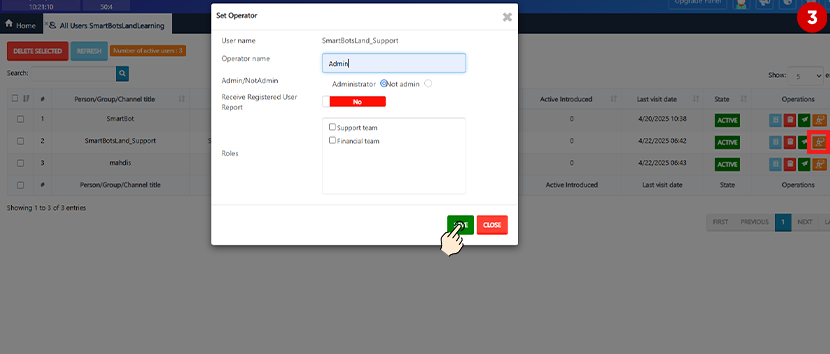
Note: The user must have started your bot and be in active status to be assigned as an operator. If they don’t appear in the list, ask them to start the bot first, then refresh the user list.
Recipient Settings in the Formmaker Button
-
Reply by Operator
Set this to Yes to allow your operators to respond to users’ submissions directly through the bot.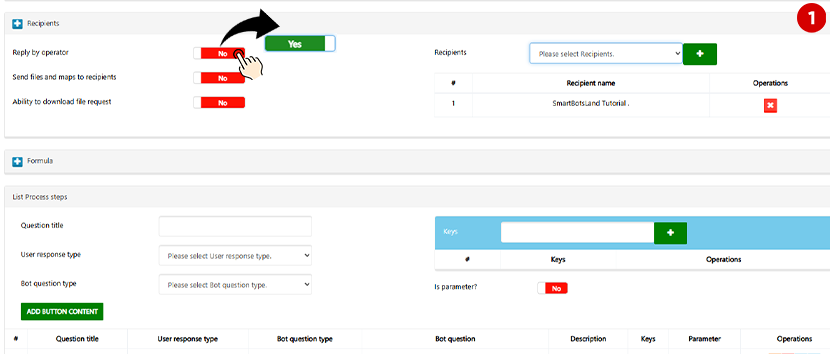
-
Send Files and Maps to Recipients
Enable this if your form collects non-text responses (e.g., photos, files, or location maps). When disabled, operators will only receive text answers.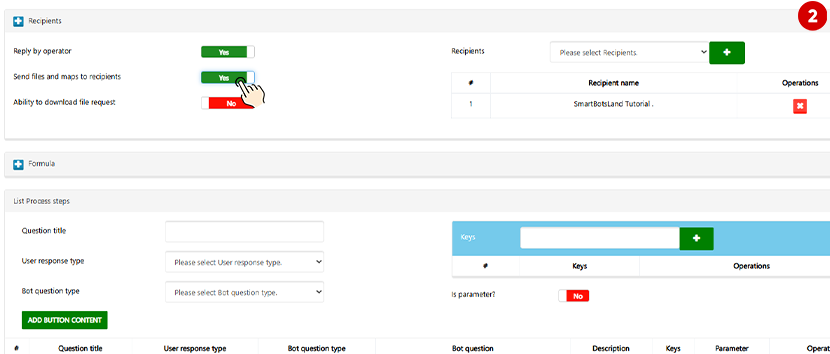
-
File Download Access
Turn this on to allow operators to download submitted files via the bot’s management panel. Without this, they won’t be able to access attachments submitted by users.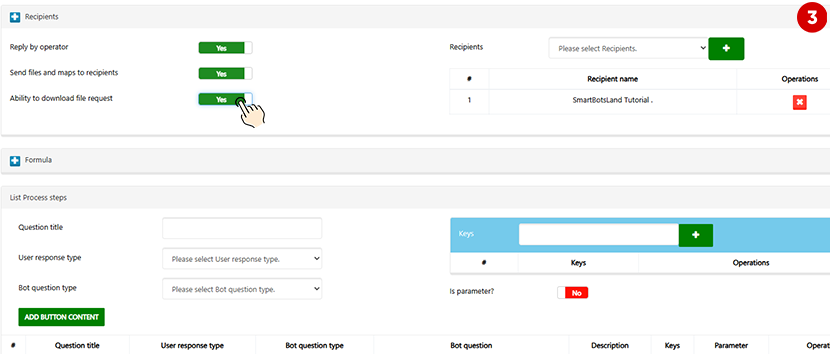
Note: Make sure the “Receive Reports” option is set to Yes for each operator; otherwise, they won’t receive any form reports.
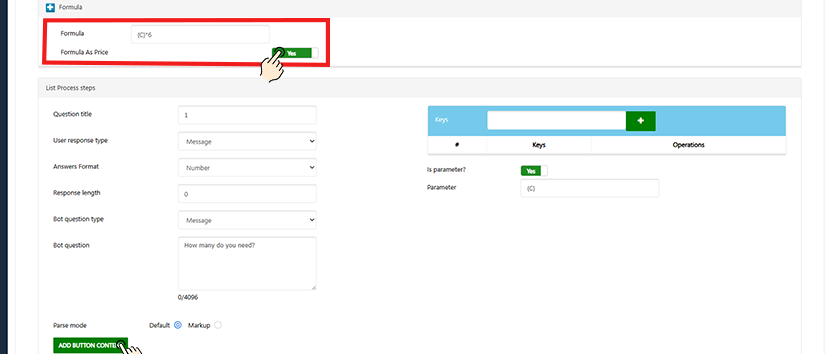
If you’re creating advanced forms in your Telegram bot and need to do calculations like totals, prices, or scores, Formula Buttons are exactly what you need!
What’s a Formula?
A formula is a math calculation that helps your bot process users’ answers. For example, you can multiply a number the user enters by 2, or calculate a total cost based on several inputs.
What’s a Parameter?
A parameter is a nickname for the user’s answer in the form. You define a parameter (like a or price) and use it in the formula.
So if the user types “3” and you saved it as"a", you can use it in a formula like a * 2 to get “6”.
What Math Can I Use in Formulas?
Formulas support 4 basic math operations:
| Operation | Symbol | Example |
|---|---|---|
| Add | + |
a + b |
| Subtract | - |
a - b |
| Multiply | * |
a * b |
| Divide | / |
a / b |
You can also use parentheses to control the order, like in math: (a + b) * 2.
Where to Use the Formula?
You can use a formula in a FormMaker button — this is a special button in your bot that asks questions, takes user answers, calculates a result, and shows it or uses it for payment.
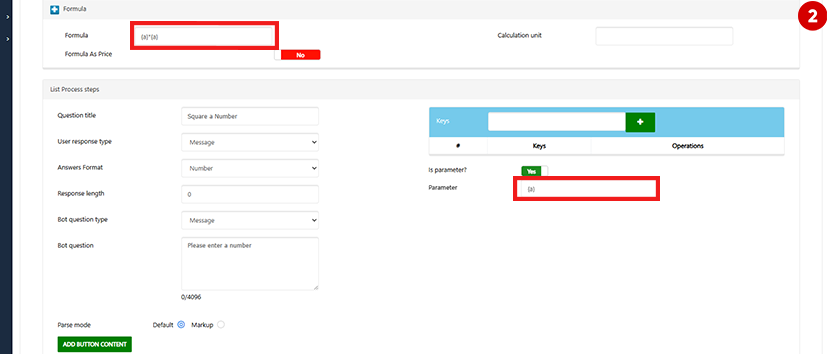
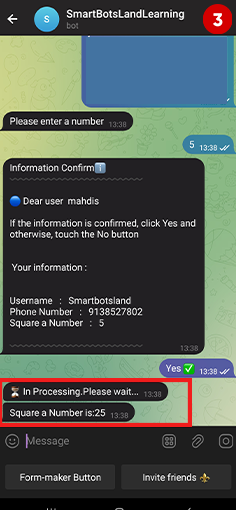
Example 1: Square a Number
Let’s say you want to calculate the square of a number.
-
Create a form button and ask the user to enter a number.
-
Save the user’s answer as a parameter, like
{a}. -
In the formula section, write:
{a *a}. -
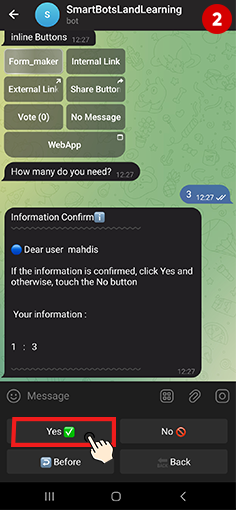
The bot will show the result (like 9 if the user typed 3).
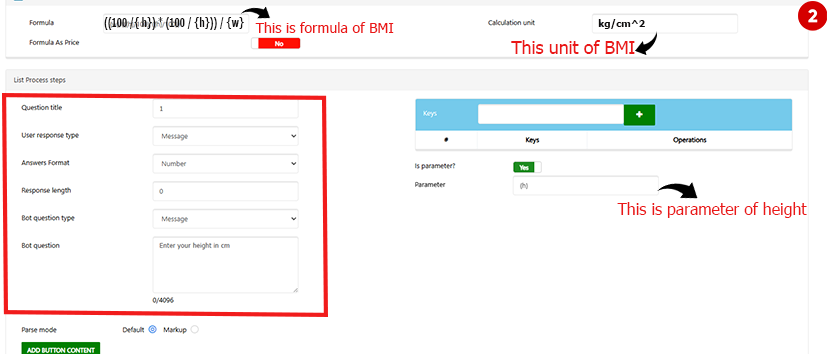
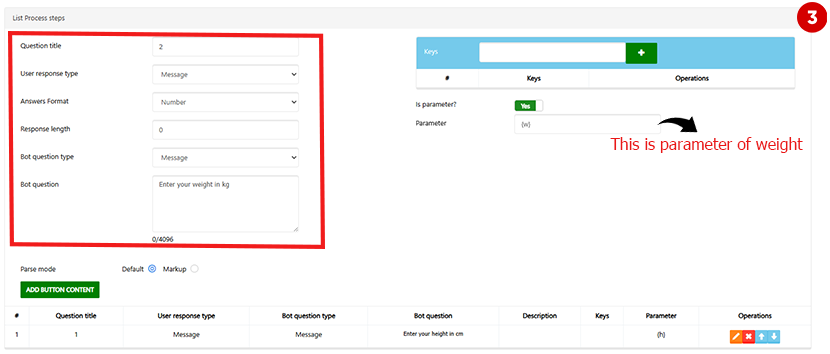
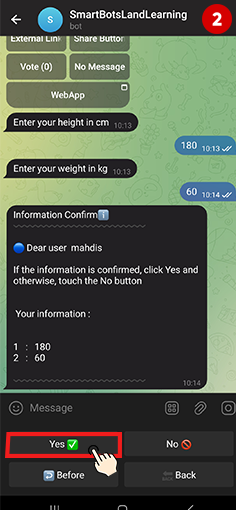
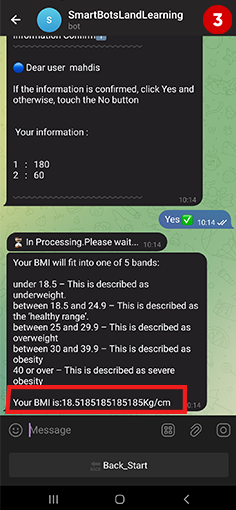
Example 2: Calculate BMI (Body Mass Index)
Imagine you have a fitness bot. You want to calculate a user’s BMI using their weight and height.
BMI Formula:
BMI = weight / (height in meters)^2
Steps:
-
Create a question: “Enter your height in cm” → save as parameter
{h} -
Create another question: “Enter your weight in kg” → save as parameter
{w} -
In the formula field, write:
h / 100? Because users enter height in centimeters, and we convert it to meters.The bot will calculate BMI and return the result!
Can I Use a Formula for Payments?
Yes! That’s one of the best features.
You can calculate an amount and use the result as the payment amount of the button.
Example:
-
Ask the user, “How many colors do you want?” → save as
count -
Price per color is $6
-
Formula:
count * 6 -
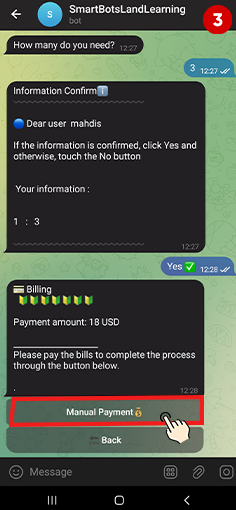
The result (e.g., 3 * 6= 18) will be the price for payment
You can set this price for
-
Manual payments (e.g., card-to-card)
-
Online payments (via gateway)
Payment Flow with Operator Check
 Payment Flow with Operator Check
-
User enters their details and sees the price
-
They send the payment or receipt
-
Operator receives the receipt and clicks Approve or Reject
-
If approved, the order is registered, and the user sees a success message like
“Your order was registered successfully. “
Pro Tip: Use Replay Feature
The operator can also use Telegram’s reply feature to answer the result of the form easily.


Replying to Form Answers in the Bot (One-Time Response)
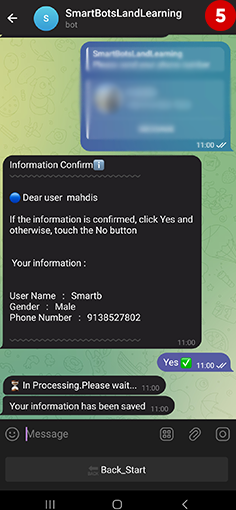
When someone fills out a form in your bot (using the Formmaker button), their answers will be sent to you as a report. Sometimes, you may want to reply to that specific user — for example, to confirm their request, send a file, or share a special code.
Important: You can only reply once to each report. So make sure to send everything you want in one message.
How to Reply:
Just use the Telegram reply feature on the message you received from the bot (the form response). Type or send your reply there. The user will automatically receive it in the bot.
After that, the bot will not let you reply again to that report. So be sure to send the full message in one go!
Examples of When to Reply
Here are some practical situations:
-
Order Confirmation
User submits a form to place an order.
🔁 You reply: “Thanks for your order! We’ll ship it within 2 days. 📦” -
Payment Verification
User uploads a receipt photo.
🔁 You reply: “Payment received ✅ Your order number is #2451.” -
Sending a TXID or Code
User submits a form to buy crypto or digital goods.
🔁 You reply: “Here is your TXID:0x8f...d92a🔐” -
Sending a File
User registers for an online class.
🔁 You reply: “Welcome! Here’s your class PDF. 📘” (and attach a file) -
Giving a Delivery Time
User orders a custom product.
🔁 You reply: “Thanks! Your product will be ready by Friday.”
How to View and Manage User Form Answers
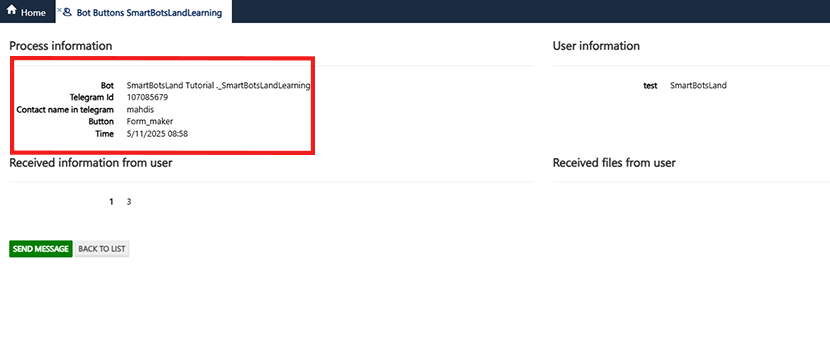
When a user fills out a Formmaker button in your bot and answers the questions, you might want to:
-
See their information
-
Reply to help or guide them
-
Send them a message or file
-
Or just check the status of their request
Who Can See the Responses?
-
Admin of the bot can view the answers in the Admin Panel
-
Formmaker Operator and Bot Admin can also check the answers directly inside the bot
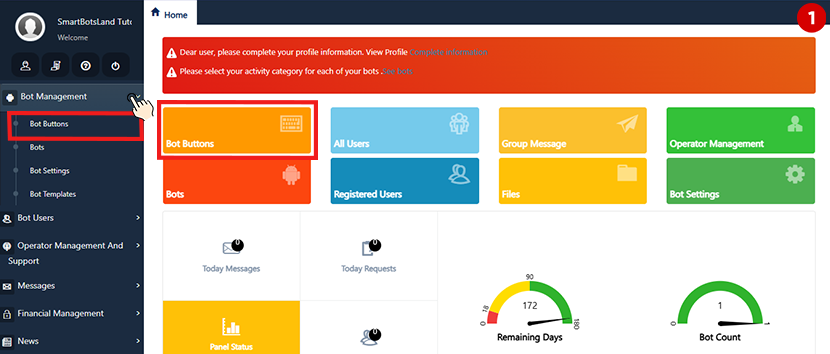
How to View Responses in the Admin Panel:
-
Open your Admin Panel
-
Click on “Bot Buttons” from the “Bot Management” menu
-
Find your Formmaker button and click the “Result Button” next to it
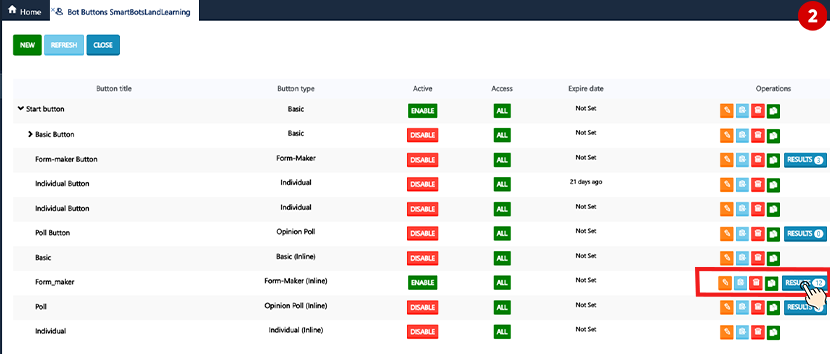
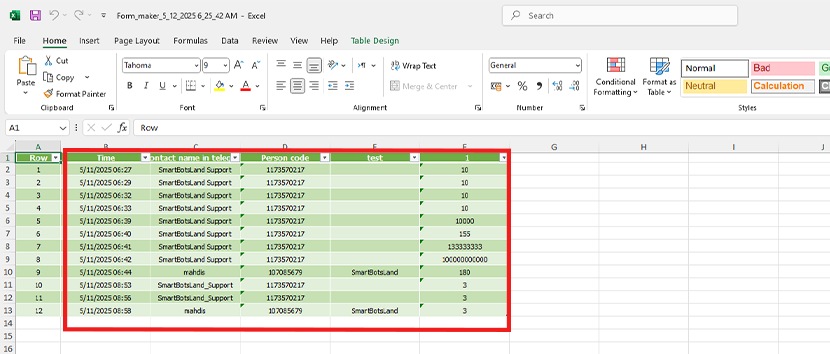
What You’ll See on the Result Page:
-
A list of all users who submitted the form
-
Their answers, name, Telegram ID, and time of submission
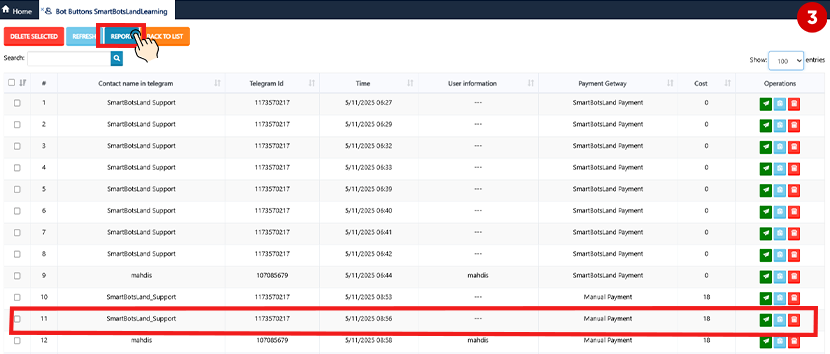
What You Can Do:
- Download the Report
Click the “Report” button to export an Excel file including:
-
-
Submission time and date
-
User’s Telegram name
-
Telegram ID
-
Each question and its answer
-
- Search
Search by name, ID, or answer to quickly find a specific user
Actions for Each User:
-
Send a message — You can send message to the user (send code, file, TXID, etc.)
-
View details — See all form answers from the user
-
Delete—Remove the user’s form entry

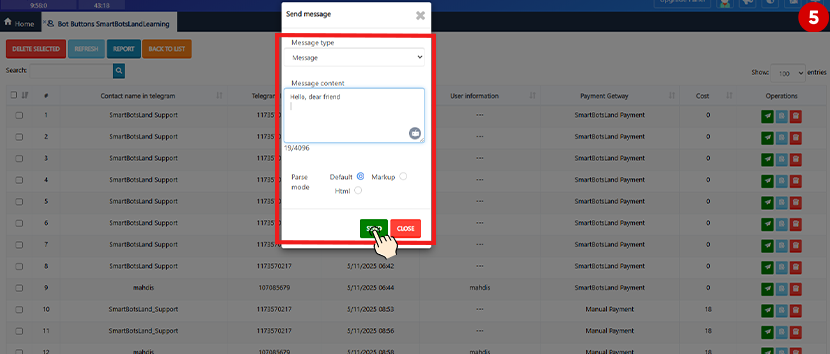
Important: You can only reply once to each user’s form submission, so make sure to send the correct message or file!
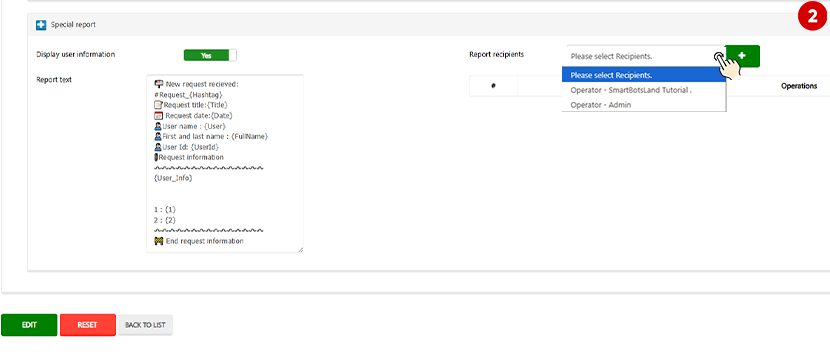
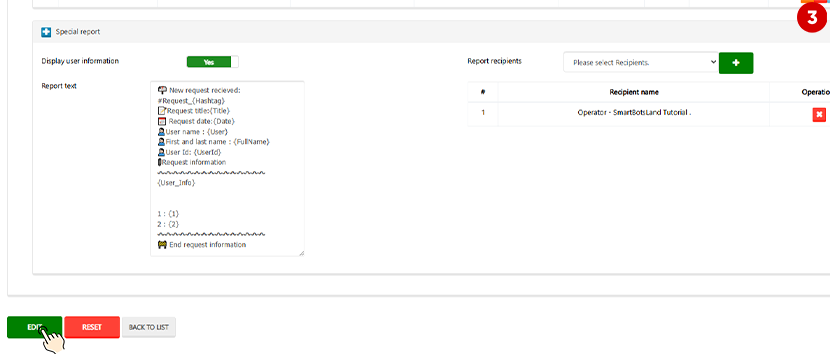
The Special Report is a customizable version of the regular user response report for Formmaker buttons. It allows you to filter the content and display only the parts you need — perfect when you want to send a trimmed, relevant version of the report to specific people.
Key Features of the Special Report:
-
You can choose which form responses or data fields to include or remove
-
You can define separate recipients for the Special Report (different from the standard report recipients)
-
The report can also be sent to Telegram channels or groups — while standard reports only go to bot operators
Filtering User Info & Answers
The Special Report includes both user information (like name, Telegram ID, and time) and answers to form questions.
You can remove any part by simply deleting its related keyword from the report format.
Example:
If you delete the line Full Name: {name}from your Special Report template, the user’s answer to that question will no longer appear in the report.
Controlling User Info Display
You can choose whether to display Telegram user info (such as request date, user ID, and profile name) in the report:
-
To remove a specific part (e.g., Telegram ID), just delete this keyword:
User ID: {UserId} -
To remove all user info, simply disable the “Show User Info” option
By using Special Reports, you can share only the necessary data with operators or send clear, concise info directly to your teams or channels. It’s a powerful way to keep things organized and private!
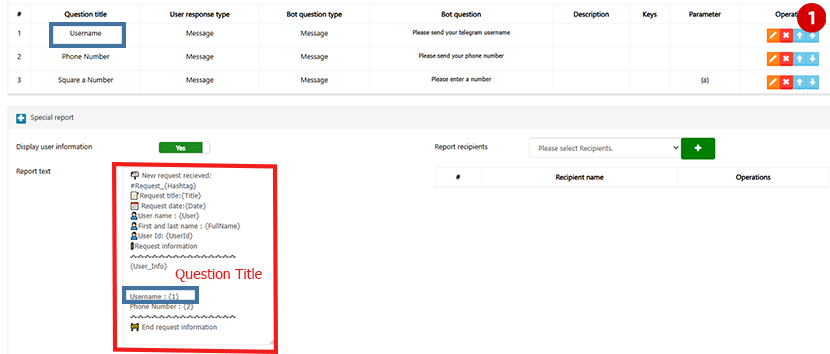
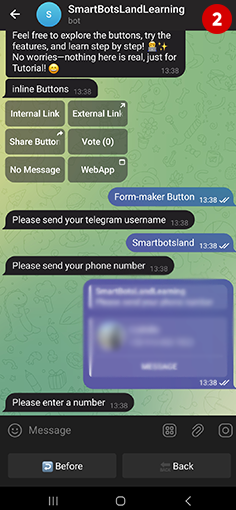
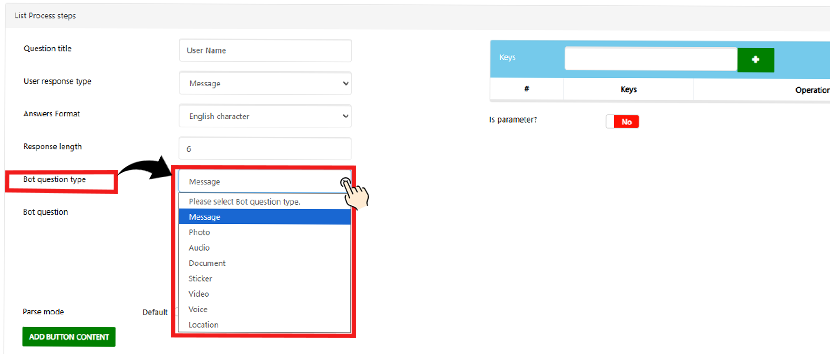
Creating Questions in Form Maker
In this section of your bot, you can design custom questions and control how users answer, how their answers are validated, and even how the question appears in the chat. Let’s go through each setting step by step:
Writing Your Question
In the “Bot Question” field, type the question you want your users to answer.
📌 Example:What's your full name?
Choosing the Answer Format
You can choose how users should respond to your question. If the answer type is Text, you can define a specific Answer Format. This helps you validate the user’s answer properly.
Available Answer Formats (for Text type):
| Format | Description | Example Answer |
|---|---|---|
| Text | Any general text | John Doe |
| Must be a valid email address | [email protected] | |
| Mobile | Must be a valid phone number | +11234567890 |
| Number | Only digits are allowed | 27 |
Response Length
You can set a maximum length for the user’s answer.
📌Example:
If you ask for a phone number, you may want to limit it to 11 characters.
-
Response Length:
11
This means users cannot type more than 11 characters in their answer.

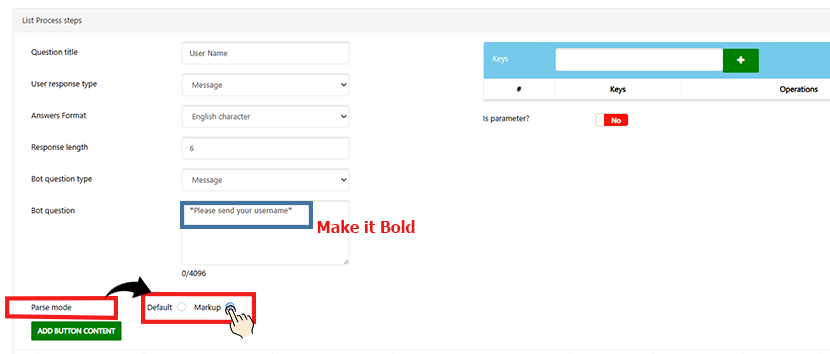
Parse Mode (Formatting the Question)
Parse Mode determines how your question looks in the bot. You can choose:
-
Default: Regular plain text.
-
Markup: Allows you to format the text with bold, italic, and more.
📌 Example with Markup:
In the question box, type:*What is your email address?*
This will appear in bold.
Markup formatting examples:
-
*Bold text*→ Bold text -
_Italic text_→ Italic text -
`Code style`→Code style
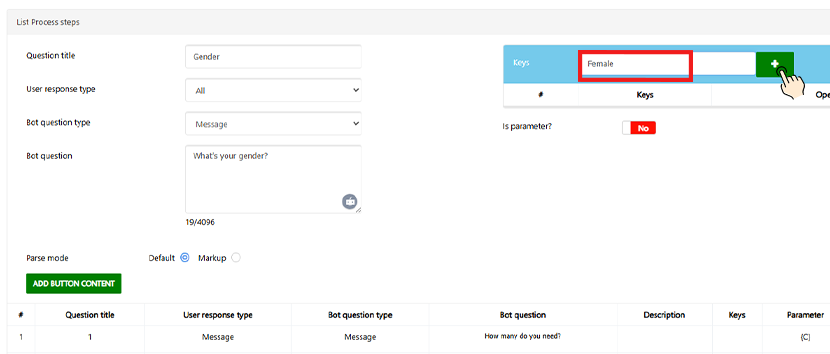
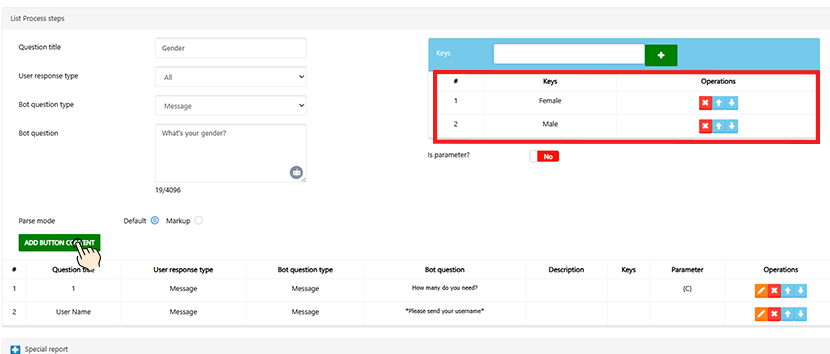
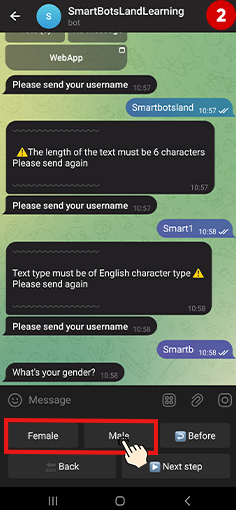
Adding Options as Buttons (Quick Reply)
You can add preset answer options (buttons) for the user to choose from instead of typing.
📌 Example:
Question:What’s your gender?
Options:
-
Female
-
Male
The user will simply tap the button instead of typing their answer.
You can add these by enabling keyboard buttons in the question settings.
Summary Example
Let’s create a complete question:
Question:
*What is your email address?*
-
Answer Type: Text
-
Answer Format: Email
-
Response Length: 50
-
Parse Mode: Markup (so the question is bold)
-
Validation: Must be a valid email
📌 This will ensure
-
Users see a clearly formatted question.
-
They can’t type more than 50 characters.
-
They must enter a valid email (e.g., [email protected]).
Bonus Example with Buttons
Question:
_Select your preferred contact method:_
-
Answer Type: Text
-
Options (Buttons): Phone Call, Email, Telegram
-
Parse Mode: Markup (to italicize the question)
User sees:

Creating Questions in Form Maker
In this section of your bot, you can design custom questions and control how users answer, how their answers are validated, and even how the question appears in the chat. Let’s go through each setting step by step:
Writing Your Question
In the “Bot Question” field, type the question you want your users to answer.
📌 Example:What's your full name?
Choosing the Answer Format
You can choose how users should respond to your question. If the answer type is Text, you can define a specific Answer Format. This helps you validate the user’s answer properly.
Available Answer Formats (for Text type):
| Format | Description | Example Answer |
|---|---|---|
| Text | Any general text | John Doe |
| Must be a valid email address | [email protected] | |
| Mobile | Must be a valid phone number | +11234567890 |
| Number | Only digits are allowed | 27 |
Response Length
You can set a maximum length for the user’s answer.
📌Example:
If you ask for a phone number, you may want to limit it to 11 characters.
-
Response Length:
11
This means users cannot type more than 11 characters in their answer.
Parse Mode (Formatting the Question)
Parse Mode determines how your question looks in the bot. You can choose:
-
Default: Regular plain text.
-
Markup: Allows you to format the text with bold, italic, and more.
📌 Example with Markup:
In the question box, type:*What is your email address?*
This will appear in bold.
Markup formatting examples:
-
*Bold text*→ Bold text -
_Italic text_→ Italic text -
`Code style`→Code style
Adding Options as Buttons (Quick Reply)
You can add preset answer options (buttons) for the user to choose from instead of typing.
📌 Example:
Question:What’s your gender?
Options:
-
Female
-
Male
The user will simply tap the button instead of typing their answer.
You can add these by enabling keyboard buttons in the question settings.
Summary Example
Let’s create a complete question:
Question:
*What is your email address?*
-
Answer Type: Text
-
Answer Format: Email
-
Response Length: 50
-
Parse Mode: Markup (so the question is bold)
-
Validation: Must be a valid email
📌 This will ensure
-
Users see a clearly formatted question.
-
They can’t type more than 50 characters.
-
They must enter a valid email (e.g., [email protected]).
Bonus Example with Buttons
Question:
_Select your preferred contact method:_
-
Answer Type: Text
-
Options (Buttons): Phone Call, Email, Telegram
-
Parse Mode: Markup (to italicize the question)
User sees:
The Special Report is a customizable version of the regular user response report for Formmaker buttons. It allows you to filter the content and display only the parts you need — perfect when you want to send a trimmed, relevant version of the report to specific people.
Key Features of the Special Report:
-
You can choose which form responses or data fields to include or remove
-
You can define separate recipients for the Special Report (different from the standard report recipients)
-
The report can also be sent to Telegram channels or groups — while standard reports only go to bot operators
Filtering User Info & Answers
The Special Report includes both user information (like name, Telegram ID, and time) and answers to form questions.
You can remove any part by simply deleting its related keyword from the report format.
Example:
If you delete the line Full Name: {name}from your Special Report template, the user’s answer to that question will no longer appear in the report.
Controlling User Info Display
You can choose whether to display Telegram user info (such as request date, user ID, and profile name) in the report:
-
To remove a specific part (e.g., Telegram ID), just delete this keyword:
User ID: {UserId} -
To remove all user info, simply disable the “Show User Info” option
By using Special Reports, you can share only the necessary data with operators or send clear, concise info directly to your teams or channels. It’s a powerful way to keep things organized and private!
How to View and Manage User Form Answers
When a user fills out a Formmaker button in your bot and answers the questions, you might want to:
-
See their information
-
Reply to help or guide them
-
Send them a message or file
-
Or just check the status of their request
Who Can See the Responses?
-
Admin of the bot can view the answers in the Admin Panel
-
Formmaker Operator and Bot Admin can also check the answers directly inside the bot
How to View Responses in the Admin Panel:
-
Open your Admin Panel
-
Click on “Bot Buttons” from the “Bot Management” menu
-
Find your Formmaker button and click the “Result Button” next to it
What You’ll See on the Result Page:
-
A list of all users who submitted the form
-
Their answers, name, Telegram ID, and time of submission
What You Can Do:
- Download the Report
Click the “Report” button to export an Excel file including:
-
-
Submission time and date
-
User’s Telegram name
-
Telegram ID
-
Each question and its answer
-
- Search
Search by name, ID, or answer to quickly find a specific user
Actions for Each User:
-
Send a message — You can send message to the user (send code, file, TXID, etc.)
-
View details — See all form answers from the user
-
Delete—Remove the user’s form entry
Important: You can only reply once to each user’s form submission, so make sure to send the correct message or file!
Replying to Form Answers in the Bot (One-Time Response)
When someone fills out a form in your bot (using the Formmaker button), their answers will be sent to you as a report. Sometimes, you may want to reply to that specific user — for example, to confirm their request, send a file, or share a special code.
Important: You can only reply once to each report. So make sure to send everything you want in one message.
How to Reply:
Just use the Telegram reply feature on the message you received from the bot (the form response). Type or send your reply there. The user will automatically receive it in the bot.
After that, the bot will not let you reply again to that report. So be sure to send the full message in one go!
Examples of When to Reply
Here are some practical situations:
-
Order Confirmation
User submits a form to place an order.
🔁 You reply: “Thanks for your order! We’ll ship it within 2 days. 📦” -
Payment Verification
User uploads a receipt photo.
🔁 You reply: “Payment received ✅ Your order number is #2451.” -
Sending a TXID or Code
User submits a form to buy crypto or digital goods.
🔁 You reply: “Here is your TXID:0x8f...d92a🔐” -
Sending a File
User registers for an online class.
🔁 You reply: “Welcome! Here’s your class PDF. 📘” (and attach a file) -
Giving a Delivery Time
User orders a custom product.
🔁 You reply: “Thanks! Your product will be ready by Friday.”
If you’re creating advanced forms in your Telegram bot and need to do calculations like totals, prices, or scores, Formula Buttons are exactly what you need!
What’s a Formula?
A formula is a math calculation that helps your bot process users’ answers. For example, you can multiply a number the user enters by 2, or calculate a total cost based on several inputs.
What’s a Parameter?
A parameter is a nickname for the user’s answer in the form. You define a parameter (like a or price) and use it in the formula.
So if the user types “3” and you saved it as"a", you can use it in a formula like a * 2 to get “6”.
What Math Can I Use in Formulas?
Formulas support 4 basic math operations:
| Operation | Symbol | Example |
|---|---|---|
| Add | + |
a + b |
| Subtract | - |
a - b |
| Multiply | * |
a * b |
| Divide | / |
a / b |
You can also use parentheses to control the order, like in math: (a + b) * 2.
Where to Use the Formula?
You can use a formula in a FormMaker button — this is a special button in your bot that asks questions, takes user answers, calculates a result, and shows it or uses it for payment.
Example 1: Square a Number
Let’s say you want to calculate the square of a number.
-
Create a form button and ask the user to enter a number.
-
Save the user’s answer as a parameter, like
{a}. -
In the formula section, write:
{a *a}. -
The bot will show the result (like 9 if the user typed 3).
Example 2: Calculate BMI (Body Mass Index)
Imagine you have a fitness bot. You want to calculate a user’s BMI using their weight and height.
BMI Formula:
BMI = weight / (height in meters)^2
Steps:
-
Create a question: “Enter your height in cm” → save as parameter
{h} -
Create another question: “Enter your weight in kg” → save as parameter
{w} -
In the formula field, write:
h / 100? Because users enter height in centimeters, and we convert it to meters.The bot will calculate BMI and return the result!
Can I Use a Formula for Payments?
Yes! That’s one of the best features.
You can calculate an amount and use the result as the payment amount of the button.
Example:
-
Ask the user, “How many colors do you want?” → save as
count -
Price per color is $6
-
Formula:
count * 6 -
The result (e.g., 3 * 6= 18) will be the price for payment
You can set this price for
-
Manual payments (e.g., card-to-card)
-
Online payments (via gateway)
Payment Flow with Operator Check
-
User enters their details and sees the price
-
They send the payment or receipt
-
Operator receives the receipt and clicks Approve or Reject
-
If approved, the order is registered, and the user sees a success message like
“Your order was registered successfully. “
Pro Tip: Use Replay Feature
The operator can also use Telegram’s reply feature to answer the result of the form easily.
To ensure that your form responses are handled properly, you’ll need to assign one or more operators to your bot. Operators are the users who will receive form reports and can respond to users if needed.
How to Assign Operators
-
Log in to your admin panel.
-
Go to the “Bot Users” menu and select “All Users.”
-
Find the user you want to assign and click on the “Set Operator” icon in front of their name.
-
That’s it! The user is now an operator and can be selected in the Recipients section of your form button.
Note: The user must have started your bot and be in active status to be assigned as an operator. If they don’t appear in the list, ask them to start the bot first, then refresh the user list.
Recipient Settings in the Formmaker Button
-
Reply by Operator
Set this to Yes to allow your operators to respond to users’ submissions directly through the bot.
-
Send Files and Maps to Recipients
Enable this if your form collects non-text responses (e.g., photos, files, or location maps). When disabled, operators will only receive text answers.
-
File Download Access
Turn this on to allow operators to download submitted files via the bot’s management panel. Without this, they won’t be able to access attachments submitted by users.
Note: Make sure the “Receive Reports” option is set to Yes for each operator; otherwise, they won’t receive any form reports.
Button Size
By default, buttons are set to Large size.
However, we recommend switching to Small size for a cleaner and more compact layout.
We recommend enabling .
This ensures users can always see the available submenu options without needing to click again, making the form smoother and more interactive.
By default, the button layout (number of buttons per row and their arrangement) is inherited from the root button.
But you can override this by enabling Auto Layout, which automatically arranges buttons for better appearance.
Buttons Per Row
You can control how many buttons appear in a single row.
This helps you create a neat, user-friendly button arrangement.
Expiration Date
Each button can have an expiration date and time.
Once the button expires, it will no longer be shown to users in the bot. This is useful for time-limited offers or scheduled forms.
Payment Settings
If you want to collect a fee from users—such as for registrations, food orders, or ad placements—you can enable the payment feature in your form.
Here’s how to configure the payment section:
-
Payment Setting: Change this to Money to activate payment for the form.
-
Type Get Money:
-
Set to Forced if users must pay to submit the form.
-
Set to Optional if payment is not required, but users can choose to pay.
-
-
Price: Enter the exact amount you want to charge.
-
Merchant ID: Required for online payments. You can get this from coinpayments.net.
-
Authorized Number After Payment: Limit the number of times each user can submit the form after paying (e.g., 1 submission per payment).
-
Online Payment: Choose your preferred payment gateway (e.g., CoinPayments).
-
Manual Payment: Enable this if you want to allow users to pay manually and upload a receipt.
-
Description: Add a short note about what this payment is for. It will be shown to users during the payment process.
-
Receipt Type: Specify how users should provide their proof of payment — such as uploading a photo, entering a transaction code, etc.
-
Button Title
Choose a name for your button. For example: Register, Order, or Feedback.
Parent Button
Choose where this button will appear. You can place it in the main menu or under another button.
Reply Type
Two options:
- Manual Text—Shows a predefined message to users after they submit the form
- Web Service—Sends data to your custom API endpoint (for developers)
End Process Message
Set a message that will be shown after the form is submitted (e.g., “Thank you for your response!”).
Number of Permissions Allowed
By default, it’s set to 0 (unlimited responses). Change it to 1 if users should only fill out the form once.
Status
- Enabled: All eligible users will see the button
- Disabled: The button will be hidden
Access: User Groups
Decide who can see the form:
- All: Everyone
- Allowed Groups: Selected user groups only
Related: How to Group Bot users?
Access: Allowed Users
Choose between
- All: Public access
- Registered users: Only users who are already registered
Receive Confirmation
If set to Yes, users will receive a message confirming their form submission.
How the Form Maker Button Works
This button opens a custom form inside your Telegram bot. You define the questions, response types (text, photo, audio, etc.), and who can see the form. Once users submit their responses, you can:
- Show a confirmation message
- Send the data to a web service
- Receive responses directly in your operator panel
- Even request a payment at the end!
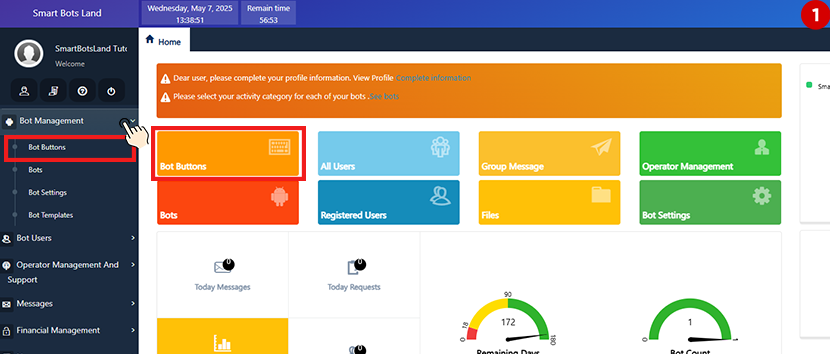
How to Create a Form Maker Button
Here’s a step-by-step guide:
- First, register your bot with @BotFather
- Then, log into the SmartBotsLand admin panel
- From the dashboard, go to Bot Buttons
- Click on “NEW,” then choose “CREATE FORM MAKER BUTTON.”
What Is the Form Maker Button in SmartBotsLand?
One of the most powerful features in the SmartBotsLand bot maker is the “Form Maker button.” It allows you to create interactive forms that collect information from users inside your Telegram bot.
Whether you’re registering users for an event, collecting orders for your restaurant, gathering customer feedback, or even wanting to collect orders for your shop—this button is what you need!
When Should You Use the Form Maker Button?
Use the Form Maker button when you want to:
- Get user information through custom questions
- Create a registration form (e.g., course sign-up)
- Accept food orders or service requests
- Collect feedback, complaints, or suggestions
- Gather necessary data before a payment is processed
It’s perfect for any case where multiple questions need to be asked and responses saved.
Why Use the Form Maker Button?
Because it’s:
- Simple to use (no coding needed)
- Highly customizable (question types, visibility, access control)
- Works perfectly in Telegram’s environment
- Supports payments and file uploads
- Great for both developers and non-developers


[…] you have no idea how to create a ‘form maker button’, we have already prepared a tutorial video about it. First you need to watch it and for the next step, make the payment […]
[…] of them, is form maker button. I’ve explained to you how to create form maker button in this tutorial article. You can customize the form maker button which is used for getting information from your […]